


| FAQ |
| Members List |
| Social Groups |
| Calendar |
| Search |
| Today's Posts |
|
#1
 03-25-2013, 12:09 AM
|
|||
|
|||
|
What size and type of hardware is required to mount the tail light housing. I can't seem find any photos/drawings showing the size and type of hardware that bolts the housing to the bumper. I have a GTO reproduction housing and a reproduction bumper. The upper hole in the bumper isn't large enough for even a 1/4" bolt.
Anyone know what the bracket circled in pink is used for? It also appears that the grounding straps need to be reworked. There is no way they will clear the bumper mounting bracket. 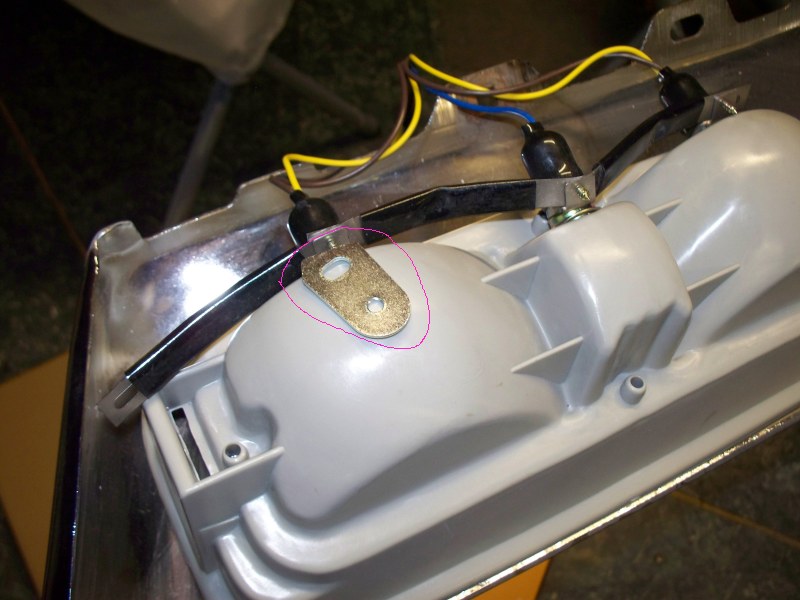
__________________
68 Lemans - GTO appearance LS3 68 Eldorado - waiting for restoration 96 Roadmaster Wagon 2014 Infiniti Q50S Hybrid Marietta GA |
|
#2
03-25-2013, 01:18 AM
|
||||
|
||||
|
That tab looks a lot like the one on the bumper that goes in the slots on the left and right side of the housing. I don't see one in the housing in your picture, did it break off your bumper?
The housings attach to the bumper with a 1/4-20 x 7/8" screw and washer through that bracket that's built in to the bumper. The ground straps bend and attach to the bumper bracket using a 5/16 screw I believe. Here's a diagram from the resto guide. It's not super detailed, hopefully it helps. I think I have a pic of the back side of my bumper somewhere too.
__________________
Ken '68 GTO - Ram Air II 464 - 236/242 roller - 9.5 TSP converter - Moser 3.55 Truetrac (build thread | walk around) '95 Comp T/A #6 M6 - bone stock (pics) |
|
#3
03-25-2013, 02:08 AM
|
|||
|
|||
|
The tab came with the reproduction housing. One for each housing. Is the upper hole in a GTO bumper tapped for a 1/4" bolt or is it for a self tapping bolt?
__________________
68 Lemans - GTO appearance LS3 68 Eldorado - waiting for restoration 96 Roadmaster Wagon 2014 Infiniti Q50S Hybrid Marietta GA |
|
#4
03-25-2013, 10:10 AM
|
||||
|
||||
|
Mine is tapped. Here's a pic of my bumper assembled. You can see the top of the bracket with the scree on the inside of the housing on the far side.
__________________
Ken '68 GTO - Ram Air II 464 - 236/242 roller - 9.5 TSP converter - Moser 3.55 Truetrac (build thread | walk around) '95 Comp T/A #6 M6 - bone stock (pics) |
|
#5
03-28-2013, 03:14 PM
|
|||
|
|||
|
I didn't use the loose bracket for the installation. Not sure what it was for. But I have to admit, they didn't fit very well. If you use the holes as is, the tail light housing face barely touches the back side of the bumper.....I slotted the holes to get a better fit. The ground straps didn't fit and I used the originals I saved. Don't forget the cap nuts on the back of the housing or the screws for the tail light lenses have nothing to thread into.....again, I saved the old ones. Finally, make sure the straps have good metal contact so the ground is secure.....I ground a bit of the powder coat off to ensure a good contact.....sucks if the lights don't work and you have to take the whole bumper back off.
|
|
#6
03-28-2013, 03:25 PM
|
||||
|
||||
|
You can always test them before you mount the bumper. Just use an old battery run the ground to your ground strap then run a positive to each of the light pick-ups. This way you can test parking lights, brake/turn signal and the backup light.
|
|
#7
03-28-2013, 08:17 PM
|
|||
|
|||
|
Yup,that's what I did when I assembled mine.Just make sure all the ground connections are good.
__________________

|
|
#8
03-29-2013, 12:51 AM
|
|||
|
|||
|
When I bought the car, the bumper had been removed as well as the tail light housing (LeMans) so I had no idea of how the GTO tail light housing and grounds were attached.
I did buy original GTO tail light housings off of EBAY but they were in very poor condition and I ended up purchasing reproductions. These observations apply to the reproduction housing. 1. The metal inserts that hold the tail light lens are missing. I complained to AMES and after a couple of days they got back and said the entire run of housings were missing the metal inserts. They admitted the housings are made in China. I was lucky AMES was able to send me 5 inserts removed from broken housings and my junk EBAY parts had 4 inserts left. Apparently earlier production runs had the inserts. 2. The ground straps are installed wrong but will work if removed and placed in the correct position. 3. They screws that hold the ground straps are very poor and won't hold. (Strip easy) 4. The tab that the ground strap screws into is thinner and softer than on the GM housing. This contributes to the screw not holding the ground strap. 5. The rubber gasket supplied with the housing is too thin. I happen to have a Metro gasket and it is twice the thickness as the one supplied with the repro housing. When using the Metro gasket, the housing will seal without slotting the mounting hole. The Metro gasket is in fact two gaskets bonded together to make a thicker gasket. 6. The tab - I have no clue. A wild guess would be to connect the grounding straps to this tab. The tab was shipped bolted in one the mounting holes in the housing. The ground strap could have been attached to this tab, but doing so would add one more place to have a grounding problem since the ground path would then be, bumper bracket, bumper and then tail light housing. I solved the ground strap connection problem by drilling out the tab slightly and using a stainless steel #8 screw, washer and nut to clamp the strap to the grounding tabs. I tapped the bumped with a 1/4-20 tap to mount the housing and tapped the bumper bracket with a 10-32 tap to attach the ground straps. I hope this helps for anyone else installing the reproduction housing.
__________________
68 Lemans - GTO appearance LS3 68 Eldorado - waiting for restoration 96 Roadmaster Wagon 2014 Infiniti Q50S Hybrid Marietta GA |
| Reply |
|
|
The PY Online Forums is the largest online gathering of Pontiac enthusiasts anywhere in the world. Founded in 1991, it was also the first online forum for people to gather and talk about their Pontiacs. Since then, it has become the mecca of Pontiac technical data and knowledge that no other place can surpass.


 Linear Mode

