


| FAQ |
| Members List |
| Social Groups |
| Calendar |
| Search |
| Today's Posts |
|
#81
 03-17-2013, 10:18 AM
|
||||
|
||||
|
Clearly you are a more refined man than he.

__________________
Some guys they just give up living And start dying little by little, piece by piece, Some guys come home from work and wash up, And go racin' in the street. Bruce Springsteen - Racing In The Street - 1978 |
|
#82
03-17-2013, 10:22 AM
|
||||
|
||||
|
Lookin good Bob! Happy 50th too! Lets see some pics and details on your paint booth.....that engine is looking FINE!
__________________
Pat Brown |
|
#83
03-17-2013, 10:34 AM
|
||||
|
||||
|
OK, a little more on the painting. I'm dying to roll the engine from the woodshop to the hot rod shop to start unmasking everything, but it is snowing outside now.
I've got a woodshop located under our house attached 3 car garage. Steel beams were used to support the upper garage floor and I built a 24X36 woodshop underneath. I'm on a downslope lot, so two sides of the shop are exposed. On the exposed end I have an 8' garage door that I used to be able to drive in from a lower driveway until the hot rod garage was constructed. Now the lower driveway leads into the hot rod shop and I have about a 10' walkway between the structures. Anyway, I built a temporary paint booth in the wood shop by hanging plastic sheeting from the existing electrical conduit and the steel beams. I built this around the rear garage door opening and then used a 24" floor fan to create ventilation. This was aided by opening a window on the exposed wall in the woodshop. It worked perfectly. A picture's worth a thousand words... 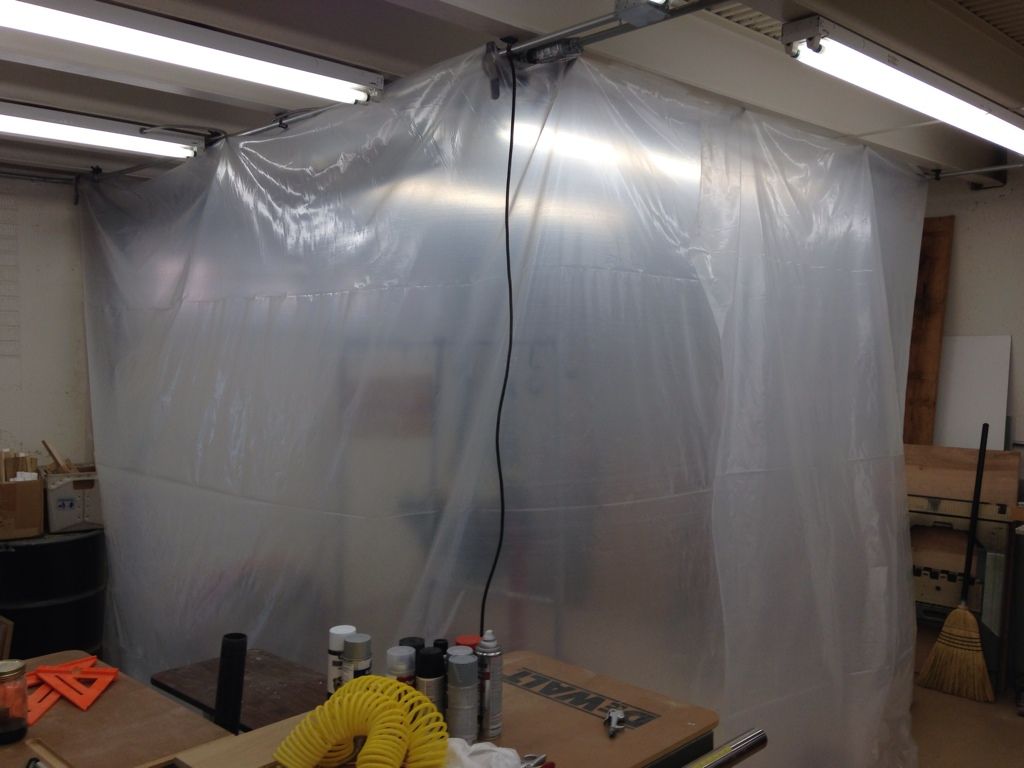   The epoxy primer is starting to fly. The rack on the left is for hanging small parts. 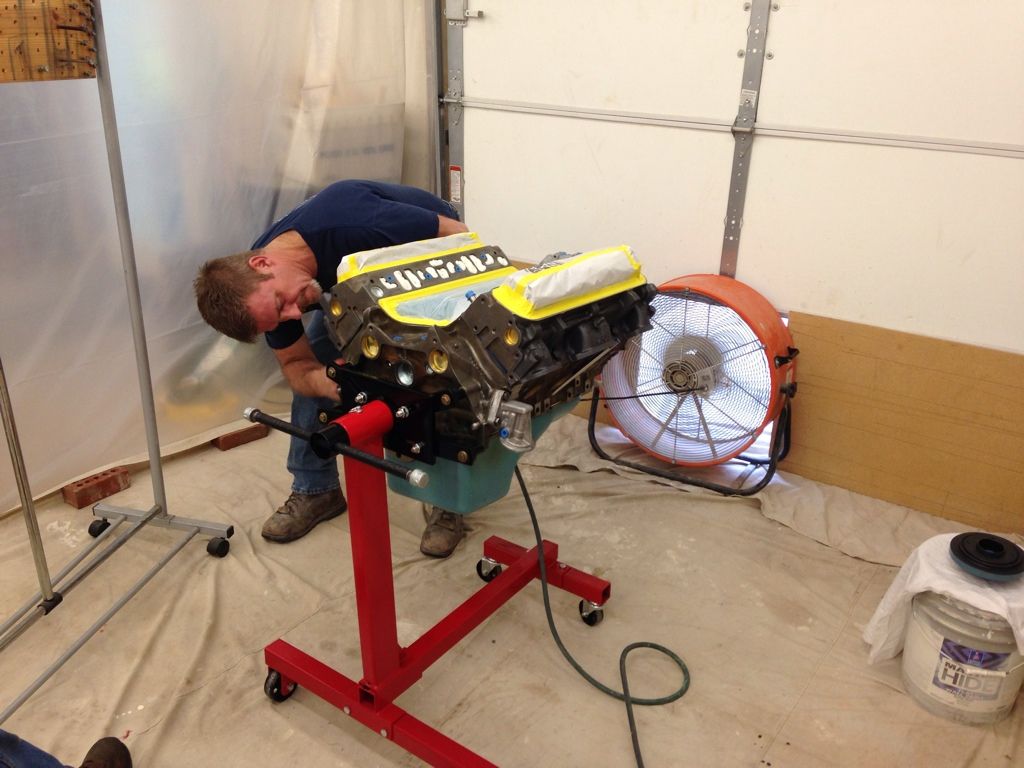
|
|
#84
03-17-2013, 11:09 AM
|
||||
|
||||
|
All right, the paint is starting to fly at this point. Danny the Painter started with a two part epoxy primer coat. He then used a high tech PPG urethane based base color coat, followed by two coats of clear. I asked him several times for the specifics on the base coat, but between the technical nature of the name and the Knob Creek effect, I can't remember exactly what PPG product it was. I had the heat cranked in the wood shop for the last several days so it was nice and warm. Between the heat, the ventilation and the hardeners DTP used, he was able to spray all 5 coats in about 3 hours. He was finished spraying by about 7:00pm edt and by the time I crashed around midnight it was totally tack free. Here's more pic's.
Primer coat is done. Time for more bourbon.  Color is going down. Time for another bourbon. We used the old oil pan just for painting purposes  Five coats done. Time for a big bourbon.  My pal Dave. When dealing with volatile chemicals, be sure to take appropriate safety measures and of course there's the bourbon. 
|
|
#85
03-17-2013, 01:11 PM
|
||||
|
||||
|
Quote:
Thanks. You know this is all your fault. It's hard to believe, but it has been almost one year exactly since you and I met in STL to consumate our deal and load the engine, transmission, rear axle and other parts into my truck for the trip back to WV. I appreciate all the help you have given me since then and also appreciate you recommending the PY Forum as a source of information and knowledge. It has been a great experience and I have learned much and met a lot of nice folks on this forum. Ok, enough for that sentimental journey.....The eagle has landed in the hotrod garage and I've got it unwrapped and most of the hole plugs pulled. Here's the pic's:    
|
|
#86
03-17-2013, 07:34 PM
|
|||
|
|||
|
Bob and Rob both have cute chicks too. lol
Mr.Dave looks like he enjoyed the afternoon, and the bourbon. Gonna be a real pretty engine no doubt about it. |
|
#87
03-17-2013, 11:07 PM
|
||||
|
||||
|
Awesome Bob. Awesome. I was thinking that too, as I am heading out to St. Louis tomorrow for two days. You going to be there for any business? LMK if you will be there. That engine looks much better now than just sitting in my basement waiting for someday to come. Glad that baby will be coming back to life very soon!!!!
__________________
Pat Brown |
|
#88
03-23-2013, 10:08 PM
|
||||
|
||||
|
Good day today. My daughter shot in her final school archery tournament (Obama hasn't banned bows yet for middle school children in WV) and afterwards My Pal Dave and I got to spend several hours working on final assembly of the 455HO. He actually got there earlier and spent several hours working on the yellow car. That's another story of a little job run amuck, but we have to get the yellow car finished up and off the rack because it will soon be time to start dismantling the drivetrain in the Lemans.
On the motor, we got a lot done. The oil pan, balancer, intake and valve covers all got installed for hopefully the last time in a long time. We also got some of the small intake parts placed to see what we either don't have or don't understand. Here's the photographic evidence.    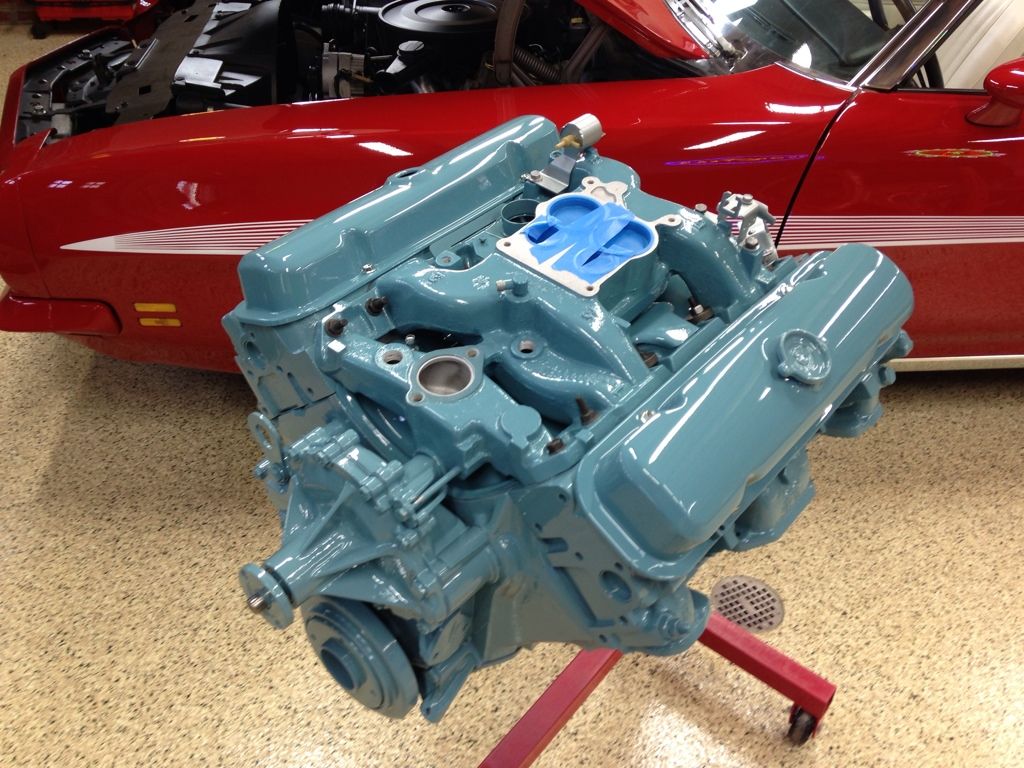
|
|
#89
03-23-2013, 10:31 PM
|
||||
|
||||
|
A few specific items from today, one of which is the preheater chimney. PB felt sorry for having stuck me so hard on the parts purchase that he agreed to modify my preheater chimney to match the original one he just recently purchased. He did a great job and everything fit fine. Thanks Pat.
Recently PB and NJ Steve discussed the correct orientation of the preheater chimney bracket - bend going up or bend going down? After trial fitting both ways, I mounted mine with the bend facing down. However, by the time the intake bolts were torqued down the actual bend was greatly reduced. Not quite flat, but very slightly turning down. I think it all worked out well. Here's a pic.  Secondly, I couldn't resist setting the carb on the intake, but when I did I noticed on the rear of the intake behind the carb, there's a flat, machined spot that looks like it should be covered with carburetor, but it's not. I have circled it on the pic below. What the deal? Does anyone know?  BTW - I'm still waiting for some input on a few underhood finish issues. |
|
#90
03-23-2013, 11:11 PM
|
||||
|
||||
|
Looks great Bob! That area is open, nothing there so no worries.
__________________
Pat Brown |
|
#91
03-24-2013, 08:07 AM
|
||||
|
||||
|
Agreed, no problem on the flat spot behind the carb - however you have a number of surfaces painted that shouldn't be and some others that should be. Wasn't the thermostat housing on the intake (& the intake on the engine) when painted & won't that surface and the exhaust port surface on the heads present a problem when you go to attach the housing & exhaust? Also - if you are going for correctness - the intake to head gasket would have been painted along with the engine.
__________________
Some guys they just give up living And start dying little by little, piece by piece, Some guys come home from work and wash up, And go racin' in the street. Bruce Springsteen - Racing In The Street - 1978 |
|
#92
03-24-2013, 08:09 AM
|
||||
|
||||
|
Was the chimney bracket on when painted? Or was that assembled when the choke was put on?
__________________
Some guys they just give up living And start dying little by little, piece by piece, Some guys come home from work and wash up, And go racin' in the street. Bruce Springsteen - Racing In The Street - 1978 |
|
#93
03-24-2013, 08:27 AM
|
||||
|
||||
|
I was curious about the intake and exhaust mounting surfaces too.
|
|
#94
03-24-2013, 08:32 AM
|
||||
|
||||
|
Valve cover & intake bolts would have been painted as well. Might have a problem with the fuel pump too with that surface painted.
Also - do you have the correct intake gasket? It looks like the exhaust crossover is open.
__________________
Some guys they just give up living And start dying little by little, piece by piece, Some guys come home from work and wash up, And go racin' in the street. Bruce Springsteen - Racing In The Street - 1978 |
|
#95
03-24-2013, 09:50 AM
|
||||
|
||||
|
Quote:
Quote:
Quote:
On the intake gasket, technically no one makes a "correct" intake gasket for a 7F6 head. However, the gasketing is correct and the opening you see above the crossover is the blind hole unique to 7F6 heads. Most believe the Pontiac engineers had this cast into the heads to prevent oil coking issues. I look forward to seeing more comments on the paint/gasket issue. Sounds like this one might be controversial. |
|
#96
03-24-2013, 10:01 AM
|
|||
|
|||
|
i'd rub the paint off the exh man gasket area with some lacquer thinner or whatever solvent went into the clear coat .
Fuel pump surface should be okay - but could rub it off too if you wanted. Looks like it was masked solid - but had bolt holes exposed - or maybe its all an illusion. Just need a smooth solid contact zone for gasket without masking lines. Whether its painted or natural. If the intake/exhaust cross-over is for certain a 72 model - it should be okay. The later heads most times do have some of that upper hole to nowhere left exposed. Anything that needs touch-up , neatly use a brush . Would leave the intake gasket like it is and settle for the -0.5 point deduction. Be extra careful if you have to do any trimming or cutting under the hood 
|
|
#97
03-24-2013, 10:11 AM
|
|||
|
|||
|
The Hot Spots (exhaust heat) are the main area where you don't ideally want any paint on the gasket sealing areas. It will burn down/disintegrate and likely cause a leak later.
Especially if there is significant film build from the primer/base/clear products. |
|
#98
07-28-2013, 10:18 PM
|
||||
|
||||
|
This project has been parked for awhile. I decided to wait until fall to yank the drivetrain in my Lemans Sport and transplant the new TH400, 12 bolt and 455 HO. To keep busy MPD and I have been doing some work on an old truck I have. Everything is mostly ready with the new Lemans drivetrain, but there are a few external pieces still need for the motor, one of which is the carb.
My Pal Dave is an experienced carb rebuilder and knows his way around a quadrajet pretty well. the plan was to find a good 1972 core and get the parts from Cliff necessary to rebuild it for the specifics of this engine. I found several '72 carbs cheap including a 2264 and a 2272 and got the necessary parts from Cliff. Then I bought a restamped 2270 on ebay for a discount, mainly for all the refinished parts. It looked great, but was junk on the inside when we broke it open. Dave took the box of carbs and the Cliff parts, and during some downtime on the truck build combined bits and pieces from all three and created the Frankencarb. We've got enough stuff left over to make another, and I've ordered more parts from Cliff to build a backup unit. Somewhere in the middle of all this I also bought an original 2270, but it's still sitting on the shelf in the box like money in the bank. I'm having fun with the truck, but I am looking forward to getting back in gear on the 455HO. Here's a few pictures of the Frankencarb.     
|
|
#99
04-08-2014, 08:28 AM
|
||||
|
||||
|
Well, has this thing been fired up yet?
__________________
Mike/Illinois |
|
#100
04-08-2014, 12:18 PM
|
||||
|
||||
|
Quote:
To be completely honest, I am struggling a little with rather or not I want to put this into the Red Car, or whether that is the best use for the engine. Sometimes I think maybe I should pull the original engine out of the Black Car for safe keeping and stick this one in its place. That way I wouldn't run the risk of grenading the matching numbers engine in some fit of youthful exuberance. What are you working on now? 
|
| Reply |
|
|
The PY Online Forums is the largest online gathering of Pontiac enthusiasts anywhere in the world. Founded in 1991, it was also the first online forum for people to gather and talk about their Pontiacs. Since then, it has become the mecca of Pontiac technical data and knowledge that no other place can surpass.


 Linear Mode

