


| FAQ |
| Members List |
| Social Groups |
| Calendar |
| Search |
| Today's Posts |
|
#41
 05-22-2012, 07:49 AM
|
||||
|
||||
|
Quote:
__________________
Tod Hoffmann 1966 GTO Montero Red Hardtop - Holley EFI'd 462, KRE DPorts/Muncie 4spd 1990 Chevy 454SS pickup - Accel DFI/T56 6spd - Hot Rod Power Tour Long Hauler 1996 Chevy K2500 ECSB 'Poopy' 2002 Honda VTX1800C 2016 Cadillac CTS Premium My project thread: http://forums.maxperformanceinc.com/...d.php?t=516826 
|
|
#42
05-22-2012, 08:14 AM
|
||||
|
||||
|
Bob - that's a GREAT car just the way she sits! Going to be a monster with the HO in there!
Thanks for the pics.
__________________
Some guys they just give up living And start dying little by little, piece by piece, Some guys come home from work and wash up, And go racin' in the street. Bruce Springsteen - Racing In The Street - 1978 |
|
#43
05-24-2012, 02:23 PM
|
||||
|
||||
|
Quote:
__________________
Regards, "455HO" Lloyd 2008 GMC Sierra Denali 2WD Crew, L92 6L80E, Silver w/ Ebony guts, 14.26 @ 98 
|
|
#44
01-02-2013, 11:01 PM
|
||||
|
||||
|
OK, I'm out of neutral and in second gear on the engine build. I got the block back from the machine shop about a month ago and the bottom end has been test fit, gaps and bearing clearances checked, et cetera. We plan to tear it down this weekend, clean everything and then reassemble. The block ended up at .040 over to remove some pitting. After conversations with several helpful PY'ers I ended up buying the Stump Puller cam from SD. We were planning to zero deck the block, but after test fitting the pistons, the deck to piston clearance averaged just .007. I'm not sure what is normal, but I am guessing the block must have already been decked when it was previously rebuilt. Dave at SD recommended decking the 7F6 heads to a 100cc chamber size which should yield a little over 9.0 CR based on the calculators. The machine shop is working on the heads now and I hope to have them back by next weekend.
I am now starting to obsess about a few engine and underhood details. I know I said that I was not going to obsess about correctness, but I have seen you guys in action and appreciate you for the sharks you are  . I would be afraid to post any post-project pictures here if the details weren't at least >90% correct. . I would be afraid to post any post-project pictures here if the details weren't at least >90% correct.First, I have ordered the ARP head bolt kit with accessory studs made specifically for the 455HO. However, I am not sure what the best place is to find a guide showing the correct fastener/stud placement. Does anyone have suggestions or some really good detailed photos? Secondly, I need to understand the specifics for wiring harness routing from the front to the back of the engine, including hold downs, protectors, et cetera. Is there a guide here or could someone again be kind enough to provide some detailed photos. I'll spend time searching the forums, but a shortcut would be appreciated. Lastly, will the wiring harness from the existing 350CI engine work ok with the 455 or are their material differences? I may replace the harness anyway, but it would be nice to know whether it is mandatory or optional. Thanks in advance for any assistance. I close with a few photos and hearty Happy New Years. |
|
#45
01-03-2013, 12:12 AM
|
||||
|
||||
|
Quote:
Regarding zero decking, I wouldn't worry over a 0.007 overall if you aren't chasing every last bit out of the engine, should be just fine. Factory most Pontiac v8s were 0.020 down in the hole. |
|
#46
01-03-2013, 08:24 AM
|
||||
|
||||
|
Quote:
__________________
Some guys they just give up living And start dying little by little, piece by piece, Some guys come home from work and wash up, And go racin' in the street. Bruce Springsteen - Racing In The Street - 1978 |
|
#47
01-03-2013, 08:34 AM
|
||||
|
||||
|
Quote:
P.S. your garage is waaaay too clean to work on a Pontiac in. Throw some dirt and grease on the floor please. :-) If you want to see some of the bolt/bracket arrangements, etc, I just got my 455HO back up and running in my 72 Formula a couple weeks ago: http://forums.maxperformanceinc.com/...695444&page=38 |
|
#48
01-03-2013, 08:52 AM
|
||||
|
||||
|
Although I do not think it is necessary to zero deck the block, I would recommend a clean-up cut on the decks of the block as a precautionary measure. Many times you can have a localized low spot or some pitting around a coolant hole that really should be addressed.
|
|
#49
01-03-2013, 10:21 AM
|
||||
|
||||
|
Quote:
Bob, I plan on outlining vacuum routing, and engine harness routing on my web site soon. Along with all the little bracket and tab do-hickeys that are on the engine. If you do buy a new harness, get it from M&H harnesses. www.wiringharness.com However, if you have ralley gauges, be sure to let them know. My understanding is they still do not put that green wire to the driverside head properly in their harness. Years ago, I sent them my GTO harness for them to duplicate and told them at that time this was the proper '72 harness for ralley gauges. I don't think they are reproducing them the right way still, at least the last I heard. The one I got from them was built to my specifications (exact as factory 72 harness with ralley gauges), but was labled as modified.
__________________
Pat Brown Last edited by PB; 01-03-2013 at 10:38 AM. |
|
#50
01-03-2013, 01:41 PM
|
||||
|
||||
|
Thanks for the helpful comments. I will not be using a unitized system, but that reminds me of the fact that I still need to track down an HEI distributor. What's the best path forward on that? Buying a ready built unit from Summit or a similar supplier, or finding a correct '72 unit and having it redone?
Chris - good to see you pop up. I had the CT contingent in for New Years and thought of you a time or two. How's your new playhouse coming along? Pat - good to hear from you as well, I hope you didn't spoil your daughter too much at Christmas. I liked the latest additions to 455-HO. I would love to have you take some pictures of the stove with the valve cover side laid along a metal rule to aid me in making the correct modifications to the '71 unit everybody sells. You're not planning on getting someone to reproduce it are you? I look forward to seeing the upcoming additions on vacuum lines and wiring. How long do you think that will be? Steve - so basically you're calling me a clean freak? I'm afraid to admit that shoe fits. The guy who is helping me ( ie. the one who really knows what he is doing and has every specialty tool known to man) gets frustrated because I am constantly putting tools away as soon as he lays them down. I'm sure things will get a little messier once we start ripping the guts out of the Lemans, but for now I am lucky enough to have the room to keep everything cleaned up and put away. |
|
#51
01-03-2013, 01:48 PM
|
||||
|
||||
|
Quote:

__________________
Some guys they just give up living And start dying little by little, piece by piece, Some guys come home from work and wash up, And go racin' in the street. Bruce Springsteen - Racing In The Street - 1978 |
|
#52
01-03-2013, 02:04 PM
|
||||
|
||||
|
Quote:
__________________
74 GTO Bracket/Street car and another 74 for the wifey to race with! 70 GTO 400, 4 spd, #'s matching and a little to nice for me to own. Friendship is like peeing your pants..everyone can see it but only you can feel the warmth! |
|
#53
01-03-2013, 02:57 PM
|
||||
|
||||
|
Glad to see people taking their "builds" seriously! Nice job Bob and Chris!!
__________________
Mike/Illinois |
|
#54
01-03-2013, 11:31 PM
|
||||
|
||||
|
Chris - the garage is coming along nicely. The picture with the plow truck really puts it in perspective. No matter how much you think you will love it now, once you are done you will love it even more. Everytime I walk into mine I smile. Good luck with the weather.
|
|
#55
01-05-2013, 01:46 AM
|
||||
|
||||
|
Bob,
I bet I didn't spoil my daughter any more than you did yours this Christmas! Makes me wish I was an only child after seeing her haul  . . Alright, I posted up part 1 of correct engine harness placement on my web site tonite. I covered the valve cover connection clips you'll need to help hold your harness in place. These are unique, smaller clips. More parts will be forthcoming! It's a start. So head on over for some detailed pics and info. What I can do, is build some templates for you to cut down one of those repopped stove bases for yourself. I've thought about buying one and modifying it up like the one I built before I found an original. Let me know your comments or questions on my web site on my companion thread: http://forums.maxperformanceinc.com/...d.php?t=716073
__________________
Pat Brown |
|
#56
01-27-2013, 01:12 AM
|
||||
|
||||
|
Progress is being made on the engine build, but it's about like watching grass grow. If I could spend as much time working in the garage as I seem to spend ordering parts, I would be much happier. Last weekend we got the crank and viton rear seal installed.. We also went ahead and installed the cam since the silicon on the rear seal had to set up before we could rotate the crank. Today we installed the pistons.
On the parts front, the heads came back from the machine shop this week. The combustion chambers were milled down to 100cc which should bring the compression slightly above 9.0 to 1. I also received the NOS idle stop I snagged, a good distributor core that will be conveted to HEI, battery cables, and boxes of small parts from PY, Ames and Inline. I've attached a few picture below. One is of my good friend Dave. He's the man when it come to machines and I am lucky to have him share his knowledge with me. In the picture, I think he is telling me that he will not allow me to drink bourbon while doing critical assembly work.     
|
|
#57
01-28-2013, 09:39 PM
|
||||
|
||||
|
Bob,
I'm envious of your friend, Dave. A good friend of mine had a 72 GTO, 455HO, I helped him do a bunch of work on it, so he could sell it, I enjoyed working on such a cool rare car....it's gone now...  Dave's advise about the bourbon, is good...LOL ...pulling the trigger on a nail gun, it may not matter, but installing the piston/rod assy, NOT good... Awesome car, garage!!! Jeff
__________________
1977 Black Trans Am 180 HP Auto, essentially base model T/A. I'm the original owner, purchased May 7, 1977. Shut it off Shut it off Buddy, I just shut your Prius down... 
|
|
#58
02-10-2013, 12:00 AM
|
||||
|
||||
|
Well we made a fair amount of progress today and had a little other excitement. I'm going do several postings to catch things up.
The main progress was on the bottom end where we got the dip stick tube, windage tray and oil pump installed. The dip stick tube install went pretty well. I followed a recommendation seen here on PY and we used a long 7/16" bolt to drive in the middle tube. This worked pretty well. The bolt slightly flared out the opening, but that's better than at least one of the alternatives. I hope we got it positioned correctly, but i think there is enough movement to allow for some field fitting if necessary later. Of course we had to remove #3 main bearing due to poor planning. The Windage tray was a PITA. I replaced the old tray with a new Tomahawk piece from BOP. I saw another post here on PY where they ran into clearance issues and sure enough we did too in the same exact place, even with 3/32" spacers. After a little hammer and sand bag massage work, the issue was resolved, but this tray has been worn out going off and on the engine. Lastly, we got the new oil pump installed, but not without more clearance issues. The pump housing was coming into contact with the windage tray in two locations and we had to remove small amounts of the housing with a die grinder. My Pal Dave had previously disassembled the new pump and did what he calls a "Blueprint" rebuild. He's into overkill which is a great way for me to learn. Note the relief dimples 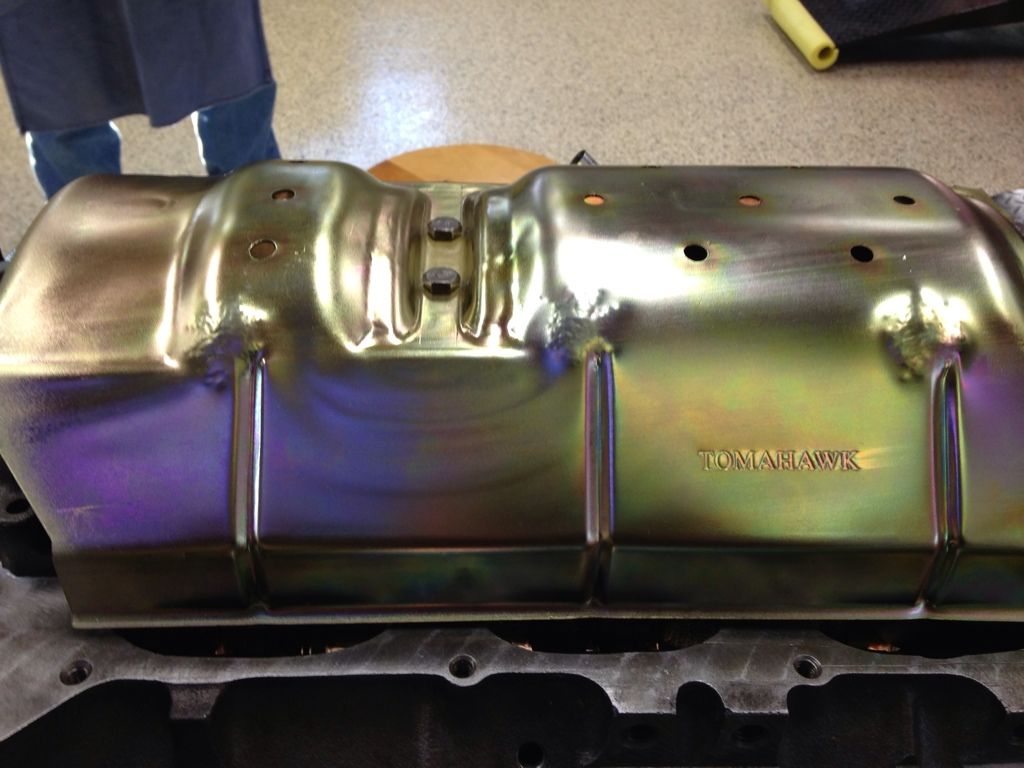 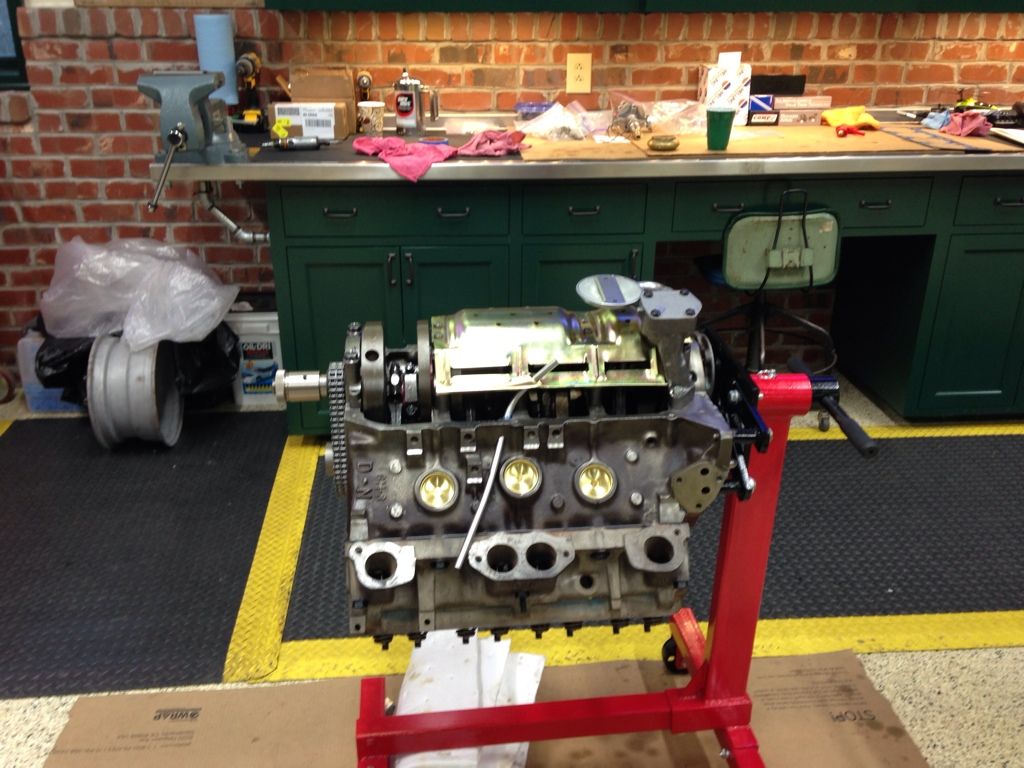 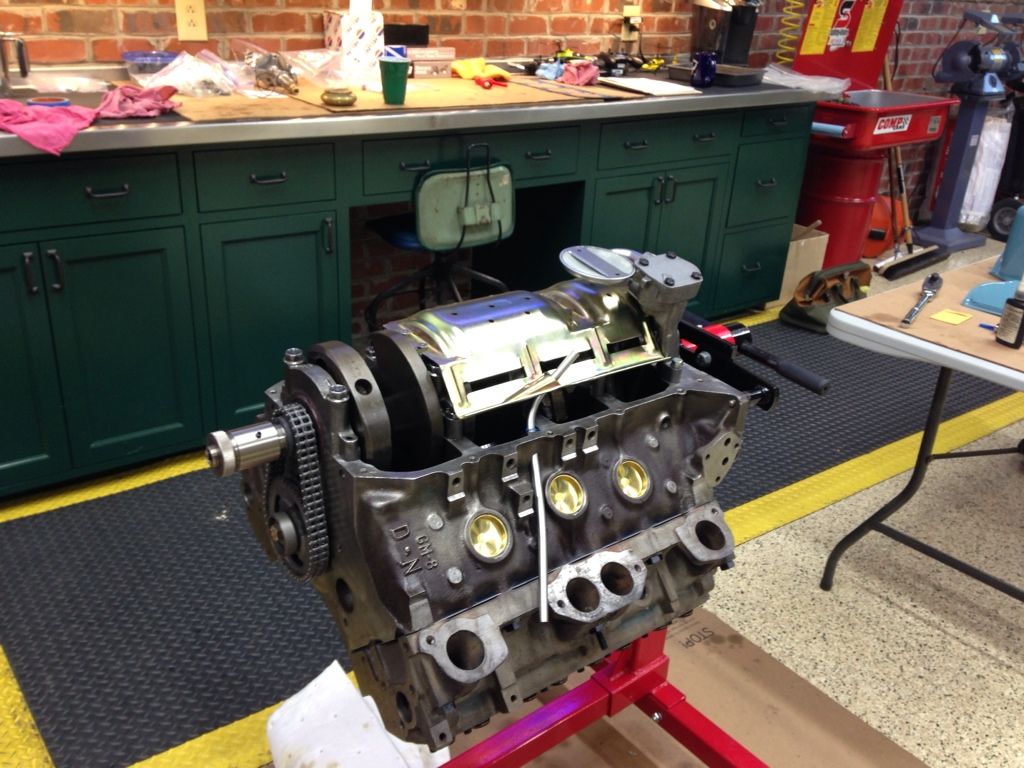
Last edited by dm_fan; 03-06-2013 at 09:30 PM. Reason: Corrected linked pictures |
|
#59
02-10-2013, 12:20 AM
|
||||
|
||||
|
While we were waiting for the new windage tray (that did not fit well) to arrive from BOP, the heads got installed to keep progress moving. I used new ARP head bolts purchased from Butlers that were specifically designated for the 71-72 HO motor and included the 4 studded bolts needed. I had a few moments of panic trying to figure out where the studded bolts went, but several of you chimed in and bailed me out. I was also concerned that the new long studded bolts at 4" were 7/16" longer than the ones that came with the motor. It turns out that the ARP bolts were correct and that the 3-1/2" bolts were D-port bolts used for "temporary" purposes.
I had the heads milled down to 100cc's to increase compression and My Pal Dave and I have been a little concerned whether the intake will fit correctly or also need a slight shave. Here's a few pic's. New bolts with a few old ones for comparison 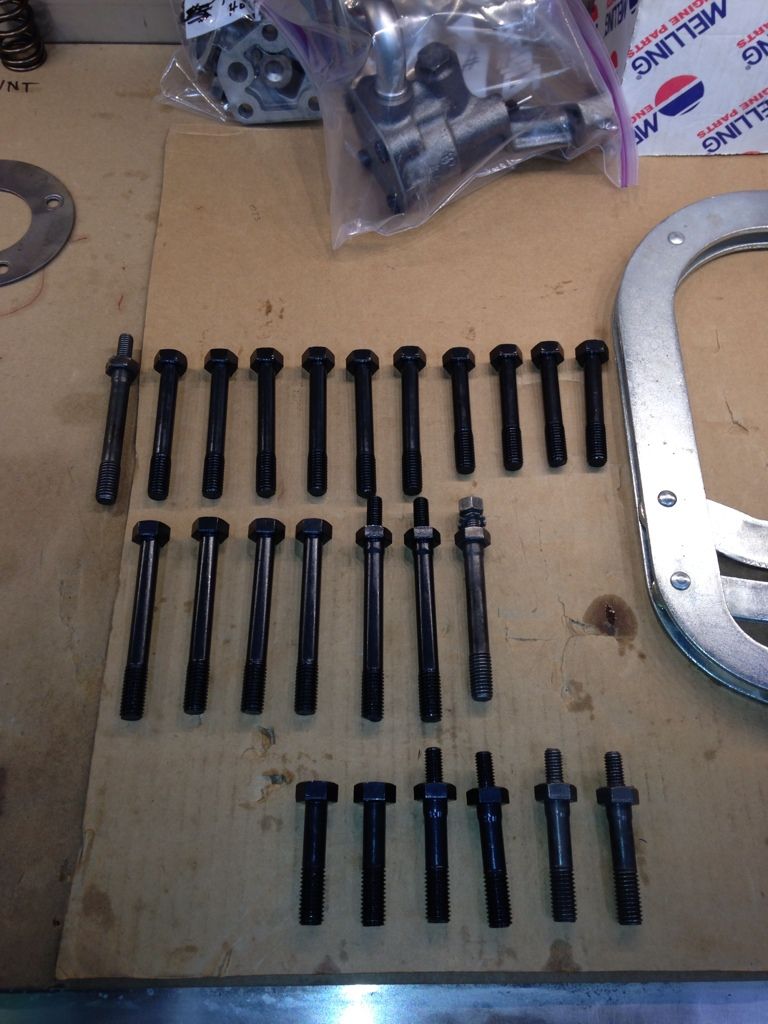 D-Port bolt on right 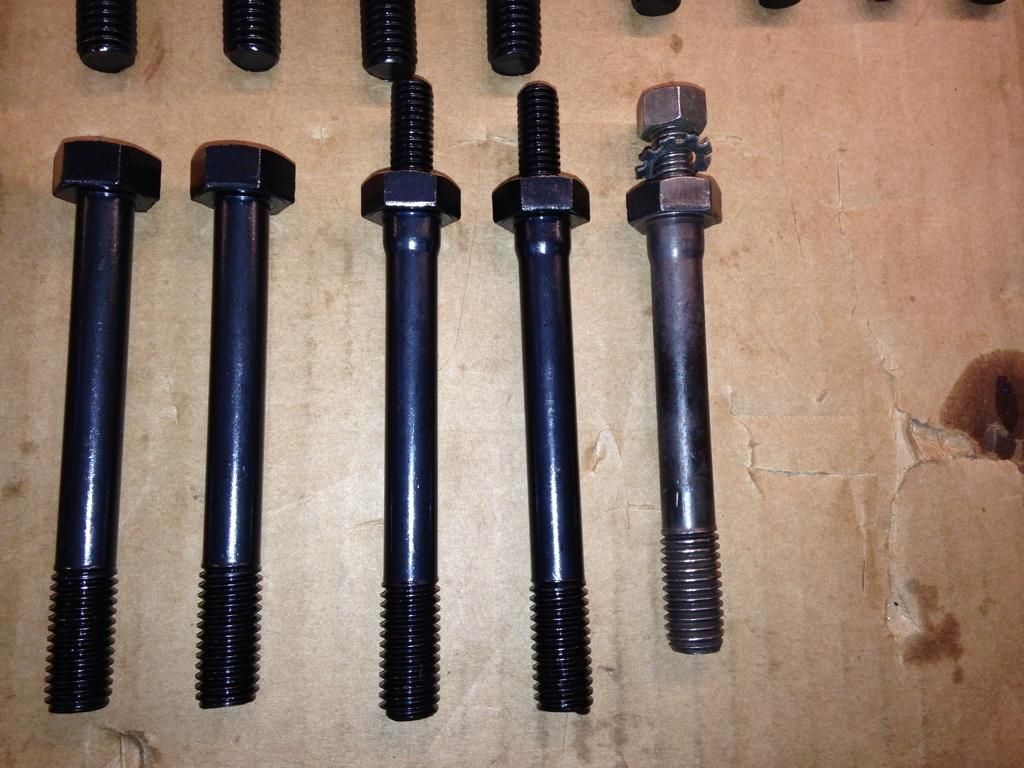 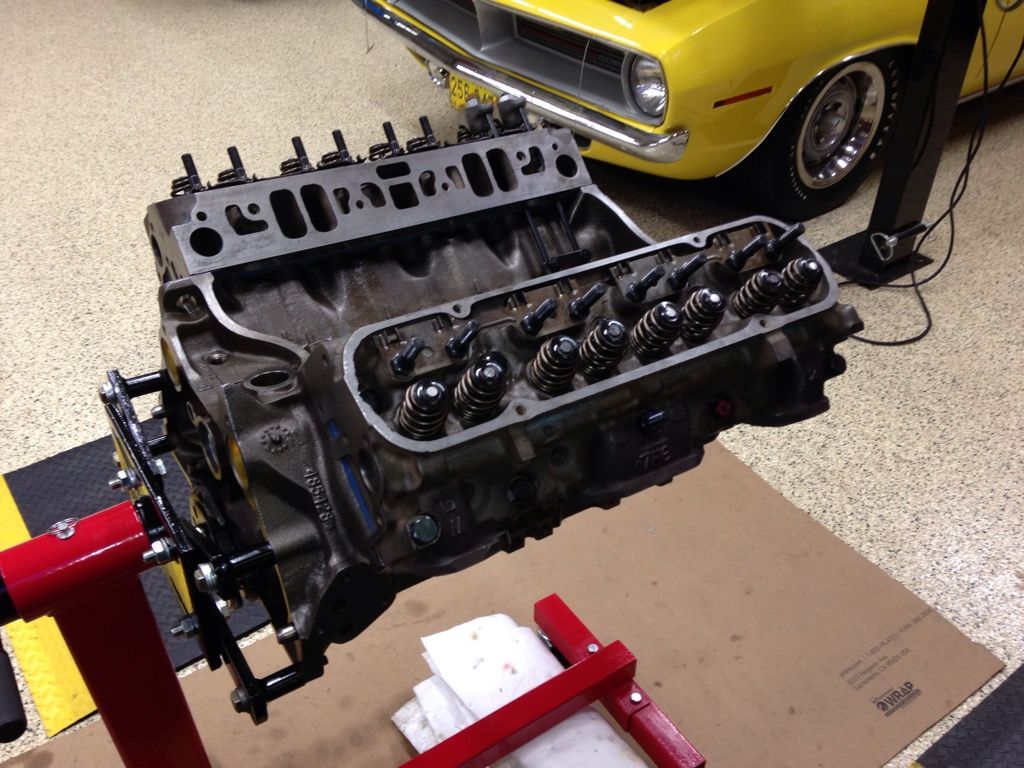 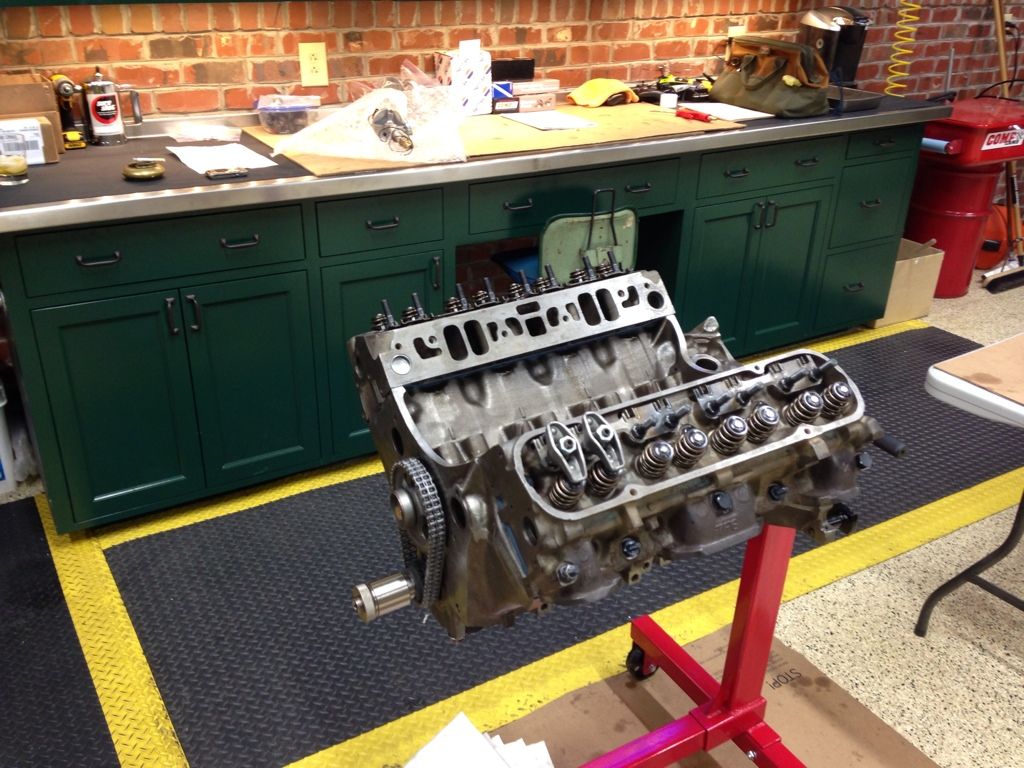
Last edited by dm_fan; 03-06-2013 at 09:31 PM. Reason: corrected linked pictures |
|
#60
02-10-2013, 12:41 AM
|
||||
|
||||
|
Last one tonight.
The big excitement today was that my paint guy showed up with a batch of parts I asked him to paint and I am totally blown away. He painted them in a booth using the Scott Tieman paint color, cleared them and then baked them. To say they look too good is almost an understatement. I was planning to just do a driveway paint job after finishing everything, but not now. My goal in having him paint these pieces was just to get a good coat of paint on the hard to paint parts like the intake, valley pan and crossover prior to assembly. While I was at it, the valve covers and oil pan needed some dents and dings fixed, so I sent them too. It looks like now I will be hauling the entire engine to his shop for final color. ( I need a recommendation on an engine cradle.) In the pictures below, the old oil pan is included in several shots. In addition, I have also included the harmonic balancer which I painted on the back side with Ames 71-73 Pontiac blue. A pretty good match actually. 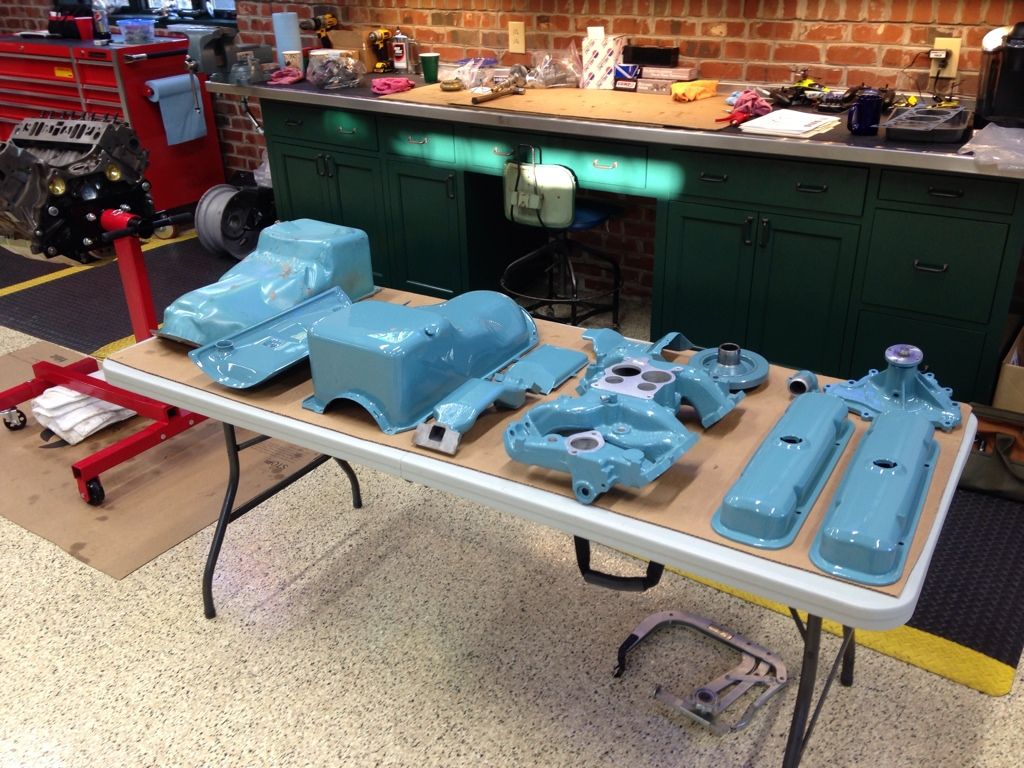 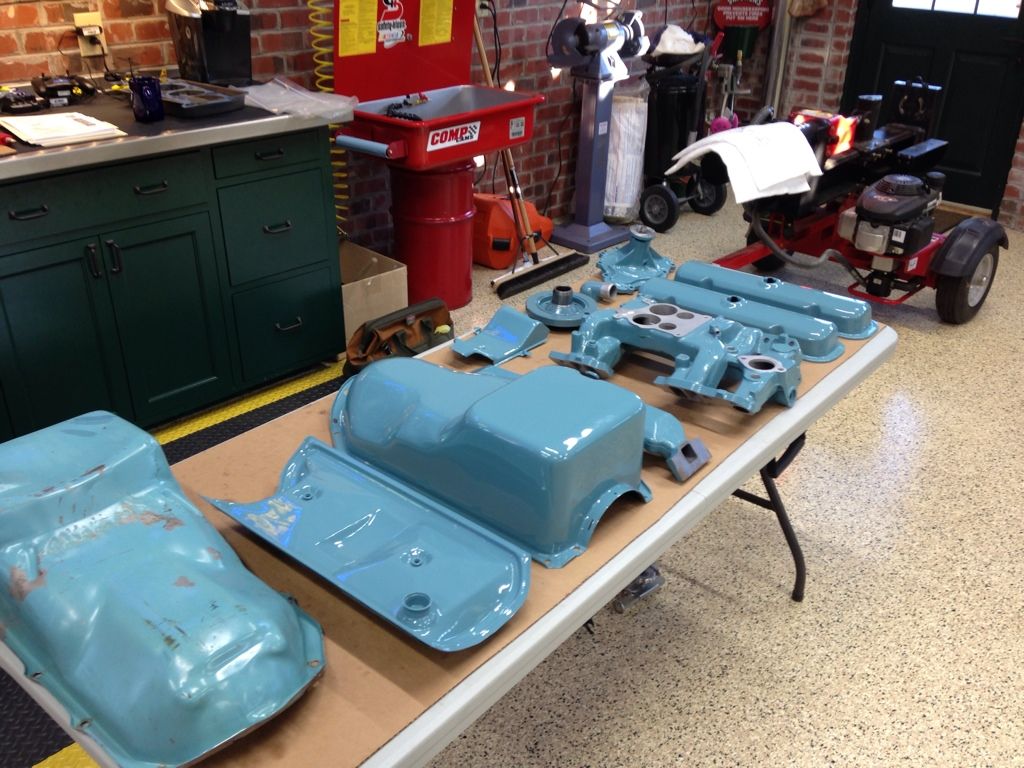 Note the Harmonic Balancer with Ames rattlecan paint 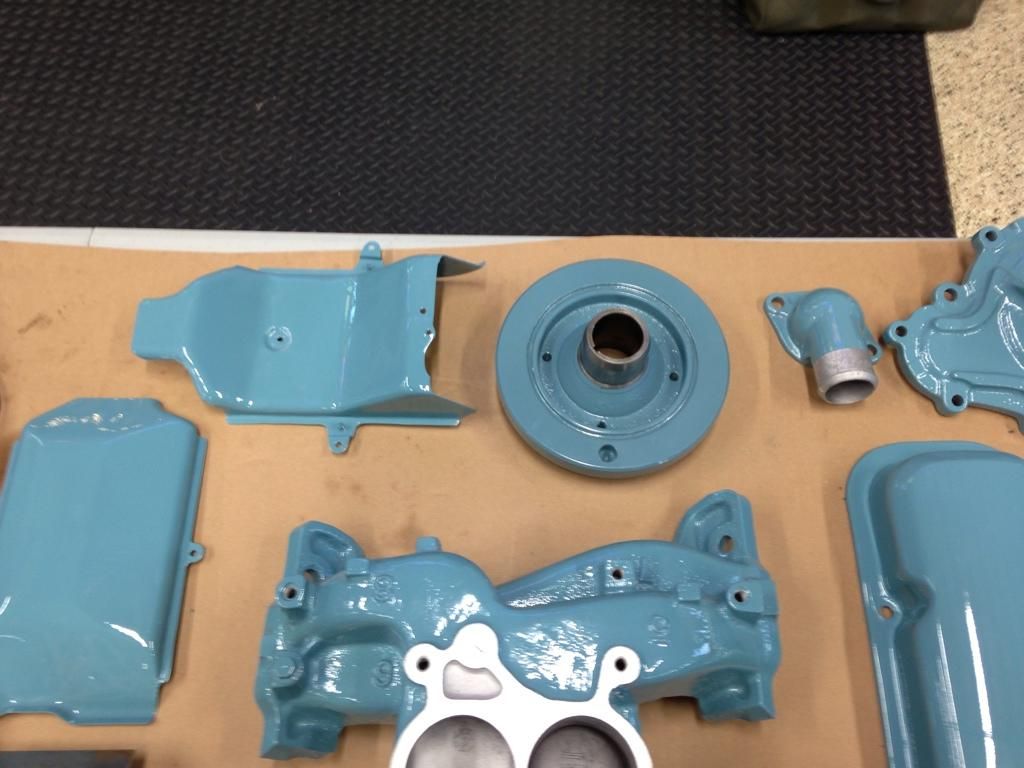 The intake fits after all 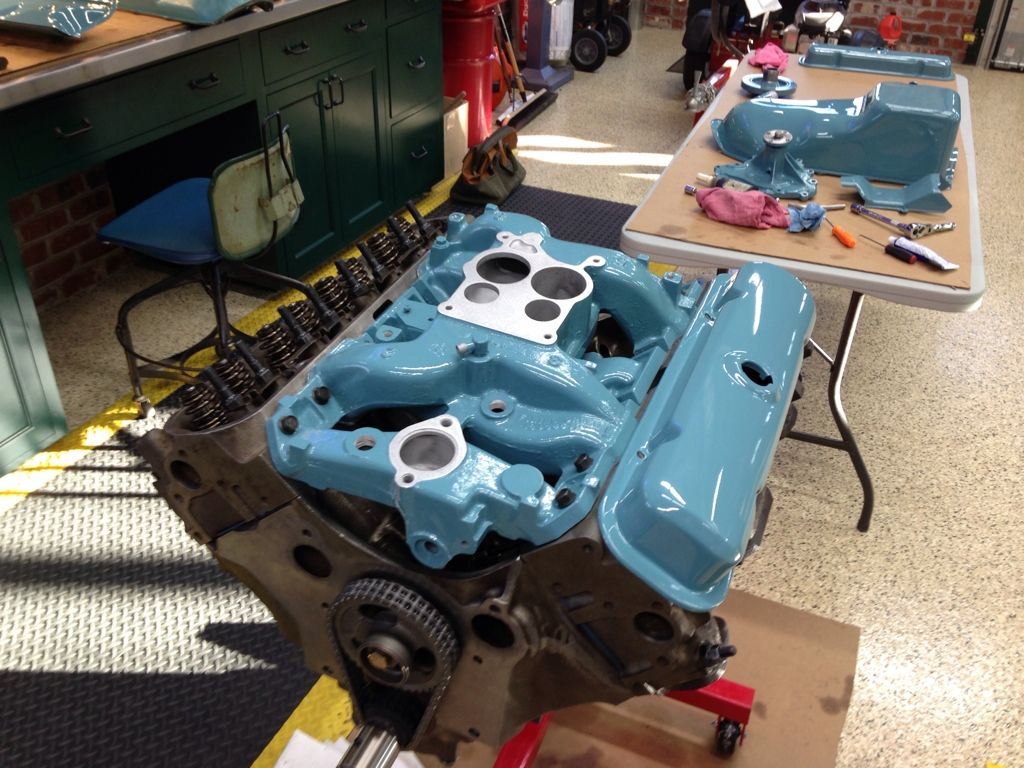 My Pal Dave thinking... "Great, now how are we going to keep from screwing this paint job up!" 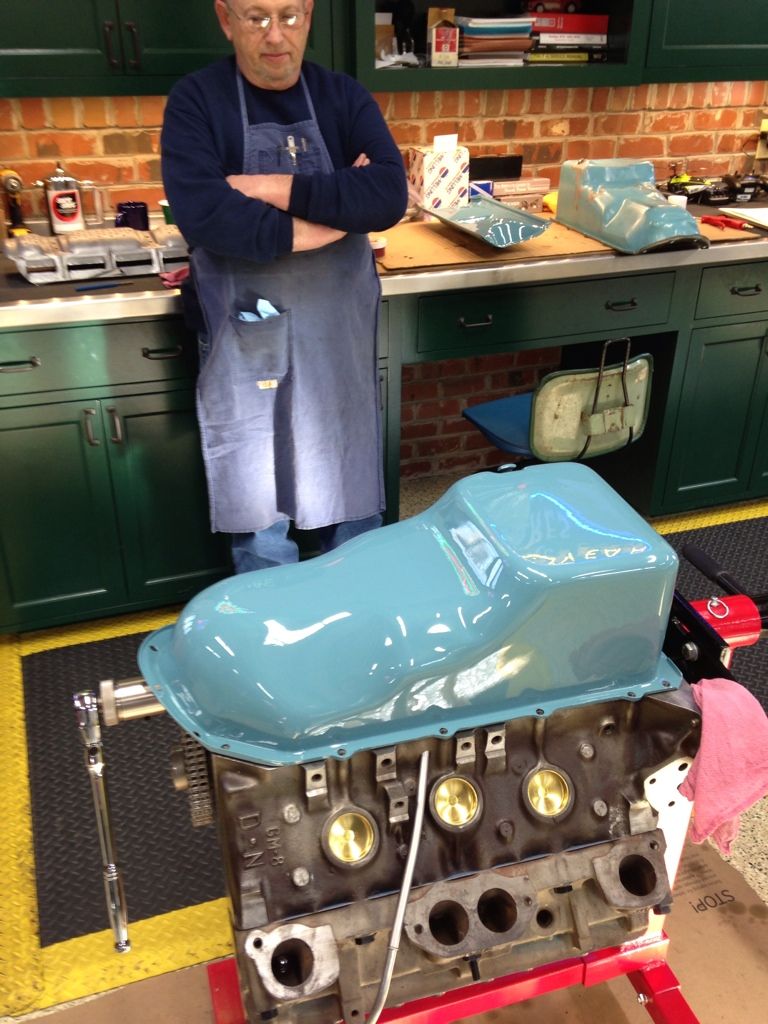
Last edited by dm_fan; 03-06-2013 at 09:32 PM. Reason: corrected linked pictures |
| Reply |
|
|
The PY Online Forums is the largest online gathering of Pontiac enthusiasts anywhere in the world. Founded in 1991, it was also the first online forum for people to gather and talk about their Pontiacs. Since then, it has become the mecca of Pontiac technical data and knowledge that no other place can surpass.


 Linear Mode

