


| FAQ |
| Members List |
| Social Groups |
| Calendar |
| Search |
| Today's Posts |
|
#101
 06-25-2020, 12:51 AM
|
|||
|
|||
|
Good info, Steve. Earlier years, of same belt types used 3 styles known as the Deluxe 1, the Vinyl 1 and the Type 2, as shown. But really, the Vinyl 1 was just the Deluxe Chrome with colour coded Deluxe metal receivers, not to be confused with the extended, plastic receivers of Type 2, usually black or coloured, never chrome. It used to be in the top-right of the diagram where now a blank area. These were interchangeable with each other.
There's also 3 types or rear anchor bolt used for the seatbelts, the simple answer is that you need the type that's fully threaded with no shoulder as they screw in all the way tight, not allowed to pivot. Plain hex/socket head will work but the Torx head is original, T50 from memory, same as bucket seat latch studs, but not the same bolt style. Edit: Just saw it also has the Vinyl head version of Deluxe 1 on diagram, just rearranged, so ignore the extra info! They don't have to match the front, just have to be a matching pair. Last edited by Aus78Formula; 06-25-2020 at 12:57 AM. |
|
#102
06-25-2020, 10:54 PM
|
||||
|
||||
|
Thanks gentlemen, I would have just purchased 79 female buckles without looking at them. With my luck, I would have gotten the wrong buckle to not match what I have.
|
|
#103
07-14-2020, 10:43 AM
|
|||
|
|||
|
Grand73Am That is one hell of a car. Beautiful.
|
|
#104
07-26-2020, 12:21 PM
|
||||
|
||||
|
Here is the update -
I Fixed a header exhaust leak with a new gasket- tough job - much harder than it looked to start as the second bolt from the end - passenger side - cant get a socket in there and barely a wrench. I had to use a shorty open end and had to have my wife use here little fingers to restart the bolt after the new gasket was in. Sounds great now. Shaker scoop is centered and correct now. Upgraded the speedo gears yesterday- waiting to check on the calibration with another vehicle. I can already tell that it is much closer than before. Found a rear Deluxe seat on ebay- had my friend repair the seams that had come loose on the back - may not need to dye as it looks good in the car. I am still deciding on a possible interior redo to the original color. Had to install a new master brake cylinder and front calipers - stops great now. Flushed the brake system with all new fluid - good to go. With the car being in as good of original shape on the exterior, I just cant figure why the previous owner(s) would have had to totally disassemble the interior- maybe different headliner and carpet (gray), different glove box door - maybe different dash- all new door panels, new console and removed the power windows. Go figure. Makes it tough to put it back to original with wrong color parts. Also looks like all the AC duct work behind the dash is missing. Car needs AC if I am going to keep it. |
|
#105
07-28-2020, 09:38 PM
|
||||
|
||||
|
Does anyone know what the oil capacity is for the OLDS 403- I put in 8 quarts to get to the full line on the dip stick. I know this is too much oil - is it 4 or 5 quarts to full?
So either this has the wrong dipstick, dipstick tube. Can someone give me measurements on the dipstick and dipstick tube? I'm thinking maybe the dipstick is too short. |
|
#106
07-28-2020, 09:41 PM
|
|||
|
|||
|
Oil and filter change is 5 qts
__________________
Steve F. |
|
#107
07-28-2020, 09:42 PM
|
|||
|
|||
|
The 350/403 dipstick tube is 9-5/8" from block mounting face to top of tube.
The matching dipstick is 18" from tip to base of handle minus the pull loop. Part #419242 probably stamped on it. |
|
#108
07-28-2020, 11:38 PM
|
||||
|
||||
|
Thanks guys, I will drain the oil and put in 4.5 quarts as I assume the filter holds half a quart. I will mark this as full on the dipstick and measure to make sure the tube is the correct length and find the right one for the car.
|
|
#109
07-28-2020, 11:39 PM
|
||||
|
||||
|
I hope I didn't do any damage as I ran it about 25 miles with to much oil.
|
|
#110
07-29-2020, 01:00 AM
|
||||
|
||||
|
It looks like the dipstick tube is 10.75" from open end of tube to the block. I checked this measurement by rolling up a piece of cardboard and slid over the tube until it hit the block.
The part number on the dipstick is 419242 and measures 20.5" from tip to the end of the outside end of the cap that slides over the tube. I did not measure the handle part that extends from there. If the dipstick tube is too long, I will just fill to 5 quarts and mark the dipstick and cut the tube down to match the full line. I have some oil on the floor dripping from the block- I hope I did not blow a seal somewhere. Maybe just the excessive oil blew out the breather. I will have to investigate further. Thanks for your advise and help on this. |
|
#111
08-04-2020, 11:49 PM
|
||||
|
||||
|
I have a question about the PCV system on the Olds 403 configuration that I am running.
The previous owner put on a Holley 750 and it looks like the PVC system is disabled and causing some venting issues. I currently have a chrome oil breather cap on the passenger valve cover and the twist on oil filler cap in a separate hole. On the driver side I have a breather with a tube / hose hole with the tube / hose missing. On the air cleaner housing mounted to the shaker scoop is a rubber hose fitting going into the air cleaner housing - hose from the housing to the valve cover (if that is where it goes) is missing. I purchased a new air cleaner which is just a 14" x 3" tall paper air cleaner. What am I missing or could someone send me photos of what it should look like. Thanks guys |
|
#112
08-05-2020, 12:09 AM
|
|||
|
|||
|
Here's a quick emissions setup for the 403, PCV one side to carb, the other side has the breather cap which also connects to original air cleaner base for reuse.
https://www.autozone.com/znetrgs/rep...5280080ff4.gif |
| The Following User Says Thank You to Aus78Formula For This Useful Post: | ||
|
#113
03-26-2023, 12:35 PM
|
||||
|
||||
|
Thanks all for your input and help - I have another question about power sources from the fuse box on the TA
The attached photo shows the BATT, ASSY and IGN terminals on the fuse box. - Are these fused and if so which fuse protects each terminal. I asked this question in the elecrical section and (with no response) , I thought I would retry the question here. |
|
#114
03-26-2023, 05:16 PM
|
||||
|
||||
|
Sorry - Typo - Should be BATT, ACCY, IGN terminals.
|
|
#115
03-26-2023, 06:15 PM
|
||||
|
||||
|
I edited this. They are fused:

__________________
John Wallace - johnta1 Pontiac Power RULES !!! www.wallaceracing.com Winner of Top Class at Pontiac Nationals, 2004 Cordova Winner of Quick 16 At Ames 2004 Pontiac Tripower Nats KRE's MR-1 - 1st 5 second Pontiac block ever! "Every man has a right to his own opinion, but no man has a right to be wrong in his facts." "People demand freedom of speech to make up for the freedom of thought which they avoid." Socrates Last edited by johnta1; 03-26-2023 at 06:28 PM. |
| The Following User Says Thank You to johnta1 For This Useful Post: | ||
|
#116
03-26-2023, 10:27 PM
|
||||
|
||||
|
I have a parking brake cable question.
The previous owner added frame reinforcement extensions and removed the parking brake cables in the process. He cut the cables just behind where the front one comes through the floor pan. I will need a new brake cable kit - but before I purchase- Will new cables work with frame extensions installed? I think I can put them above the extensions but I am not sure. With an automatic - do I need them? If they havent been used for years will there be issues connecting new cables at the rear drum brakes? Any suggestions on a new kit if I can install over the frame extenders. Thank you. Last edited by i4abuygto; 03-26-2023 at 10:34 PM. |
|
#117
03-30-2023, 12:20 AM
|
||||
|
||||
|
Quote:
https://www.firebirdtransamparts.com...dows/power.htm 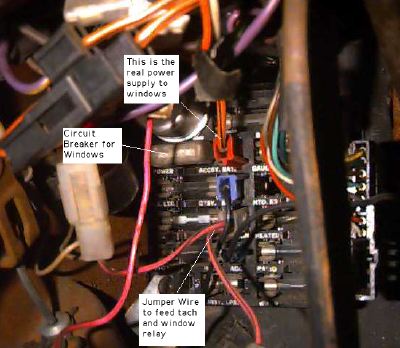
__________________
'09 Magnetic Gray Metallic G8 GT '79 T/A Solar Gold Metallic W72/WS6 '71 GT-37  
|
| The Following User Says Thank You to Hoodshaker For This Useful Post: | ||
|
#118
03-30-2023, 12:31 AM
|
|||
|
|||
|
Thought I replied to this also. Must not have hit send. Brake cable not affected by the addition of subframe connectors, they still run above as per stock. Might be an excuse to put a spring kit through the drums, depends where else was cut. New rear cables run into the drums anyway and self adjust the tension too.
|
| The Following User Says Thank You to Trevor78 For This Useful Post: | ||
|
#119
03-31-2023, 11:05 PM
|
||||
|
||||
|
Quote:
Quote:
I was asking about the fused terminals as I will be running a different supply wire to 4 relays under the console for the power windows. I also need a fuel pump feed wire and an accessory feed wire for aftermarket full time driving lights. These will both have fused relays. I will likely eliminate the stock power window relay by jumpering the orange/black and pink at the stock relay connector to get the power to pink 12 gauge wire to switch location under console. I will wire the power windows to the BATT to be not need the ignition on to operate the windows. Last edited by i4abuygto; 03-31-2023 at 11:19 PM. |
|
#120
04-01-2023, 01:52 AM
|
||||
|
||||
|
I believe the resetting circuit breaker was used because the system was prone to exceeding the current draw limit and having to replace the fuse every time that happened would not be great for customer satisfaction. It's been a long while since I've had one trip. My current '79 now has an American Autowire harness and fuse block which uses all (blade) fuses and no circuit breaker.
I bought the relays to do what you're doing but I think I've changed my mind since I have all new wiring and a much more powerful alternator-plus I'll be cleaning and greasing the window tracks. If that doesn't get the speed where I like it I may yet do the relays. Here's the schematic I was generally going to follow, in case you haven't seen it elsewhere. Note-it also recommends losing the circuit breaker in favor of a fuse. EDIT- I think I was considering just sending the pink ignition wire directly to the switch and eliminating the factory relay. The switch no longer has the full current draw running through it in this scenario-it's only triggering the the new relays who are then sending the full current to the motors. EDIT 2 This schematic doesn't show it, but I would definitely install a 30 or 40A fuse in the line coming from the battery to the relay bank-as close to the battery as possible. 
__________________
'09 Magnetic Gray Metallic G8 GT '79 T/A Solar Gold Metallic W72/WS6 '71 GT-37
Last edited by Hoodshaker; 04-01-2023 at 02:05 AM. |
| The Following User Says Thank You to Hoodshaker For This Useful Post: | ||
| Reply |
|
|
The PY Online Forums is the largest online gathering of Pontiac enthusiasts anywhere in the world. Founded in 1991, it was also the first online forum for people to gather and talk about their Pontiacs. Since then, it has become the mecca of Pontiac technical data and knowledge that no other place can surpass.


 Linear Mode

