


| FAQ |
| Members List |
| Social Groups |
| Calendar |
| Search |
| Today's Posts |
|
#41
 03-28-2014, 08:47 AM
|
|||
|
|||
|
Nice work John. The floor and the roof look like quality installation. After Im dont under the hood, Im going for the interior. This is a great thread to revert back to as Im going to do the same thing. All thought I dont have a roof

|
|
#42
03-28-2014, 11:47 AM
|
||||
|
||||
|
Looks good John.
 With all that insulation you'll be good for driving around at -20°s in the winter.  LOL And keep cool in those hot Wisconsin summers. LOL And keep cool in those hot Wisconsin summers.
__________________
 Gary Get in, ShuT Up, Hang On! Member of the Baltimore Built Brotherhood MY GTO built 4th Week of March 1966 "Crusin' Is Not A Crime" Keep yer stick on the ice. |
|
#43
04-02-2014, 12:41 PM
|
||||
|
||||
|
I didn't get the brakes bled yet, but I have made progress on my dash wiring and the A/C. This is an update on the Vintage Air A/C.
After getting the firewall pad in I put the A/C box back up under the dash and started attaching hoses. I also put in the dash vents. I am going with the factory A/C dash and lap vents I purchased from someone here on the Forum. I also flocked the abreviated glovebox that came with the kit. 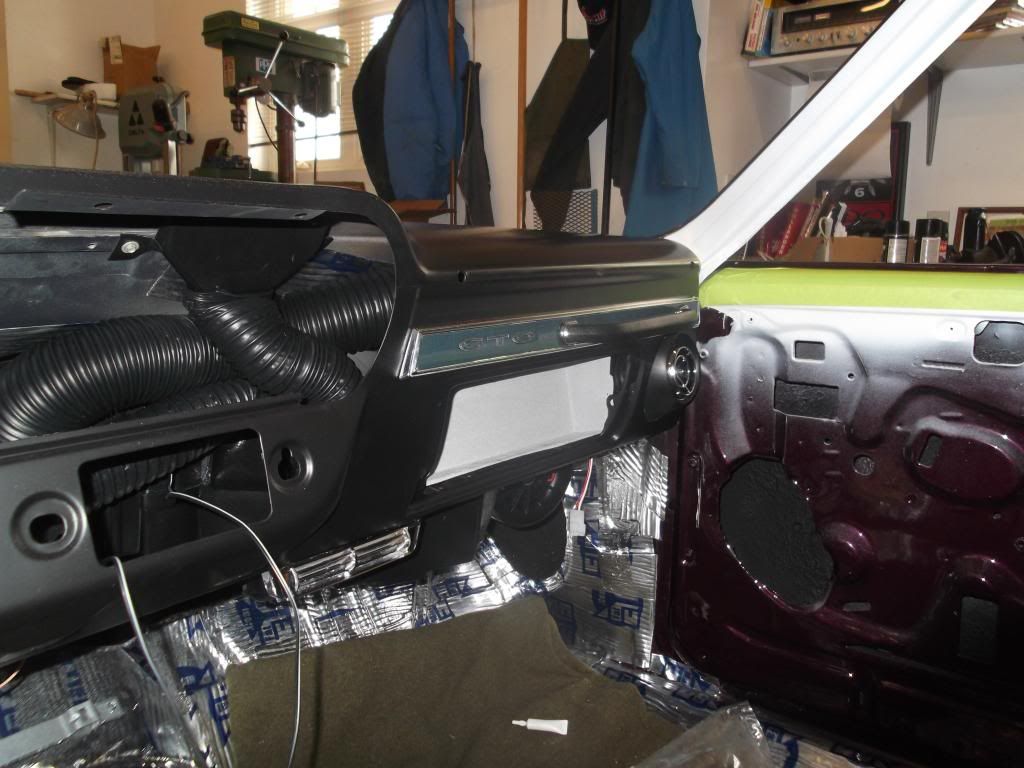 Instead of having the screws stick out into the firewall I ran factory-looking screws from the engine side in to hold up the unit. I also found a molded 5/8" heater hose to attach to the solenoid valve for the heater. Both heater hose clamps will be inside of firewall for a clean look. 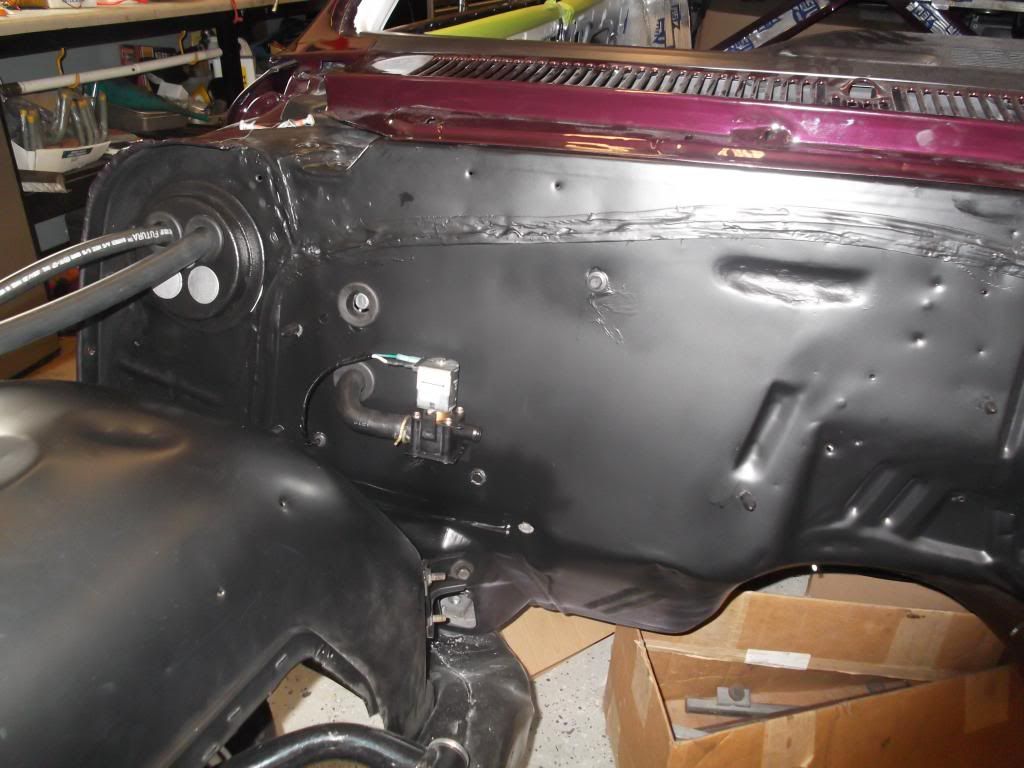 The passenger side lap vent fit pretty close to the A/C box so it will end up being mounted more to the center than what was originally intended. Here you can see what little room I have under the dash. 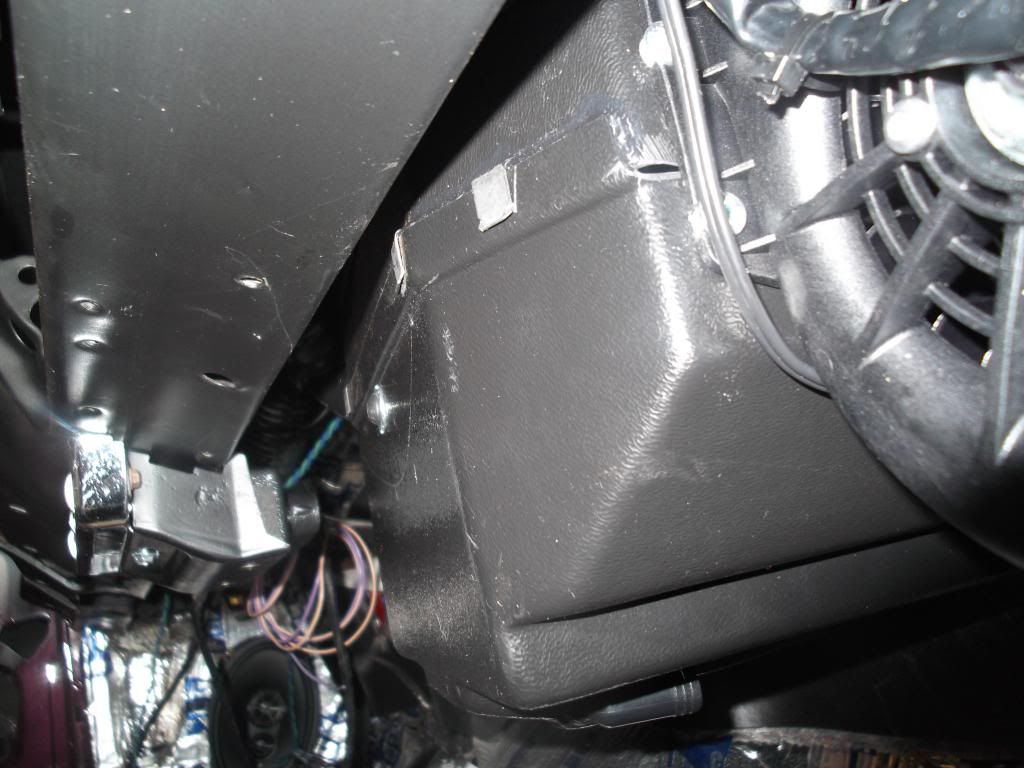 The kit includes electronic controls to replace the cables on the heater controls. I got those installed and in the dash. 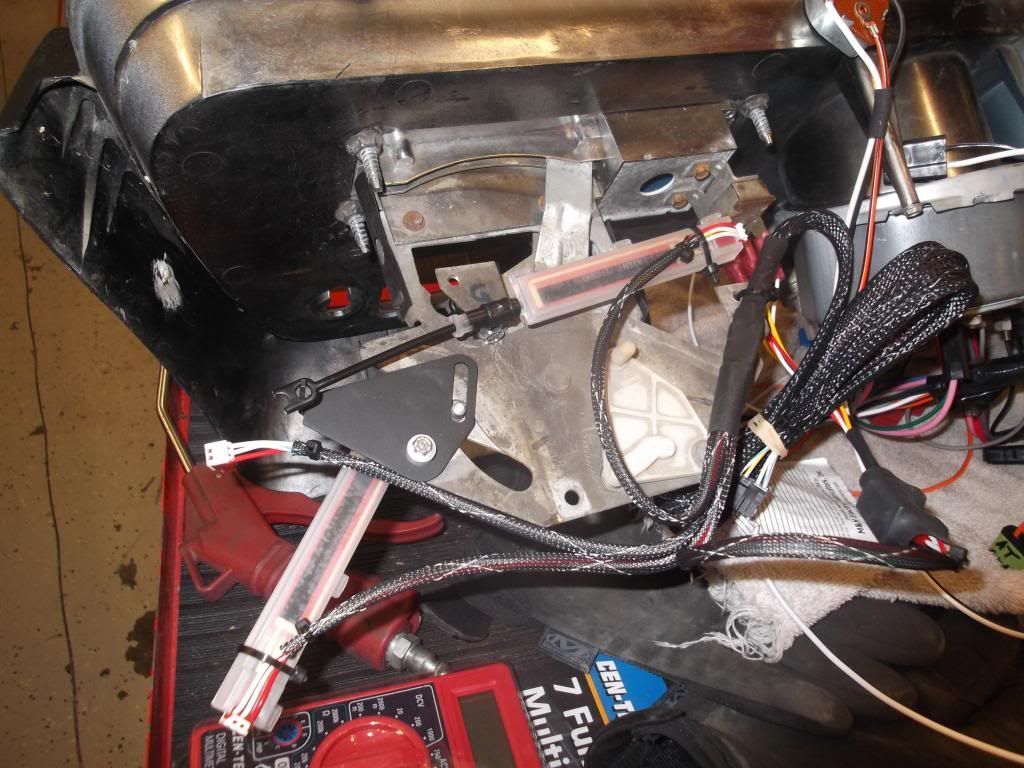 Now I am pretty close to installing dash and gas pedal, need to put in two more vent hoses to driver's side A/C. Gonna get kinda crowded in there, I hope it all fits. 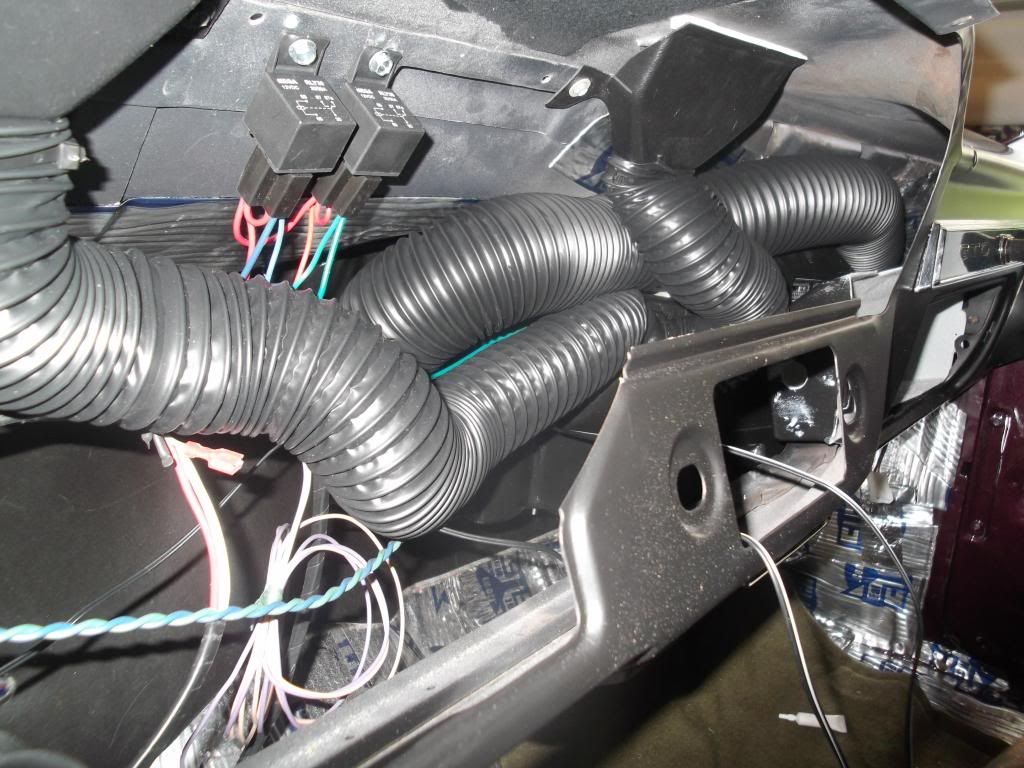 I mounted the drier on the inside of the core support. There is a pressure switch that requires access, so I drill a hole to allow for that to be installed. I had the short rubber line from the condenser to drier made up as the hard line included in the kit would not allow for this installation. A lot of the A/C hose will be hidden behind the fender once it's mounted, so this installation is cleaner than factory, IMO. 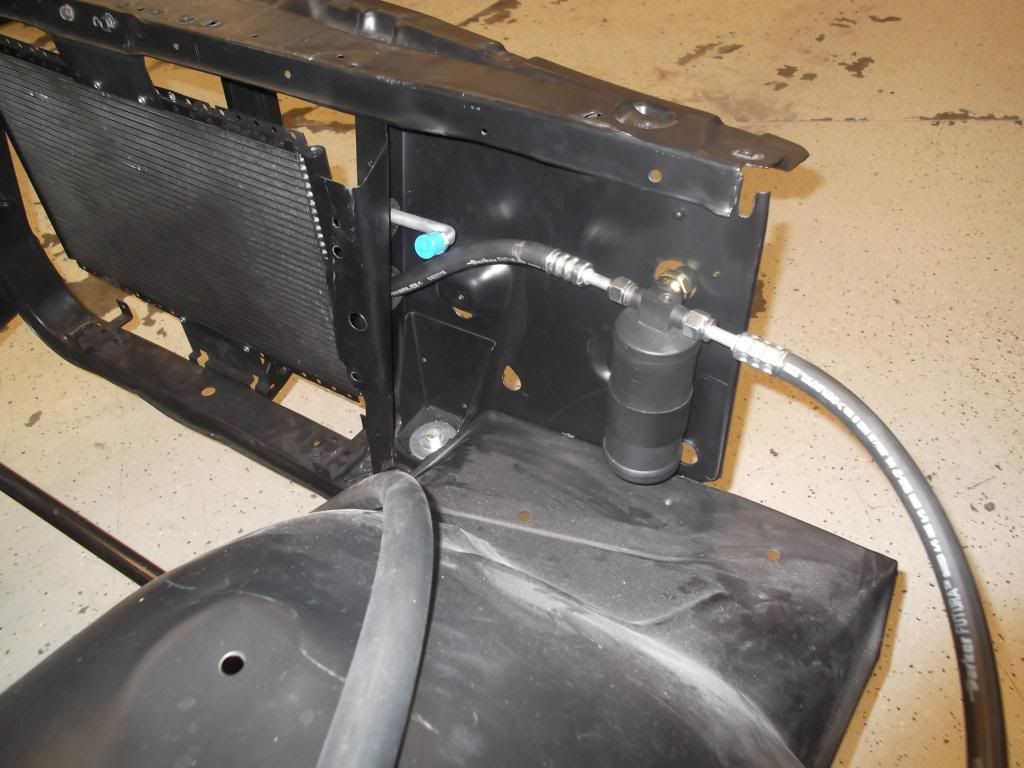 Back to work. 
__________________
John '67 Corvette Coupe 327, Tremec 5 Spd-SOLD 2010 Camaro 2SS-Traded 2015 Z51/3LT Corvette Stingray, Laguna Blue '67 GTO, 428, tripower, RS 600, finally done |
|
#44
04-09-2014, 08:27 AM
|
||||
|
||||
|
Got the engine and transmission installed yesterday. It all fits!
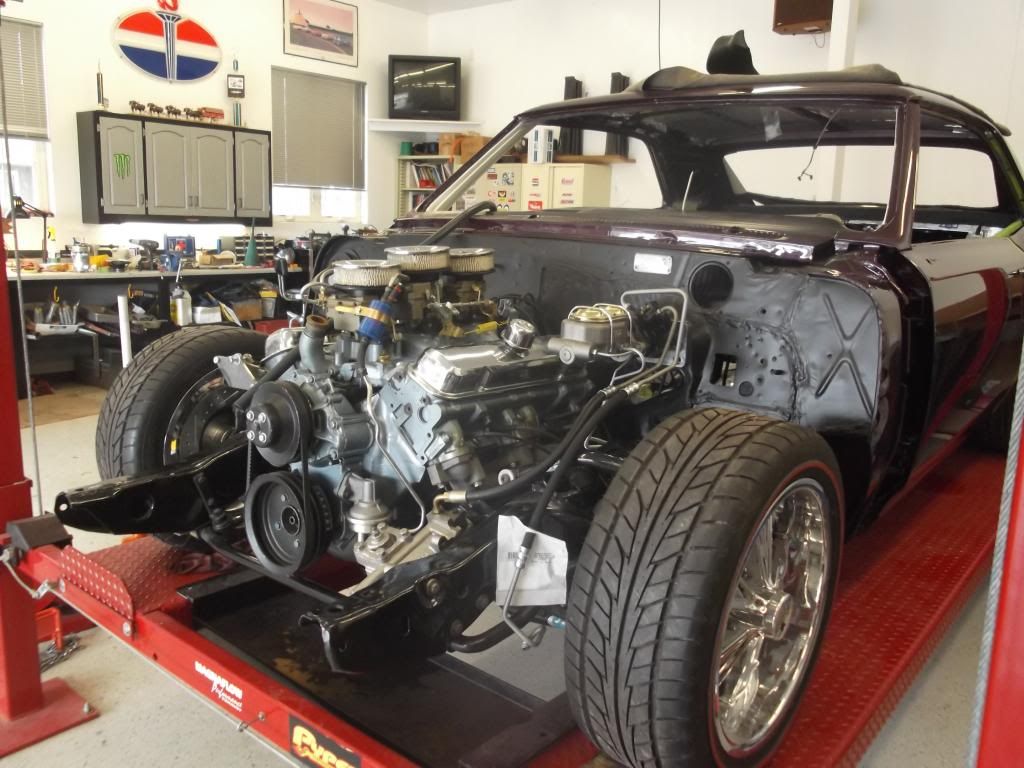 The hole for the shifter lined up well with the RS 600. I put the shifter porch on it and it lines up well also. 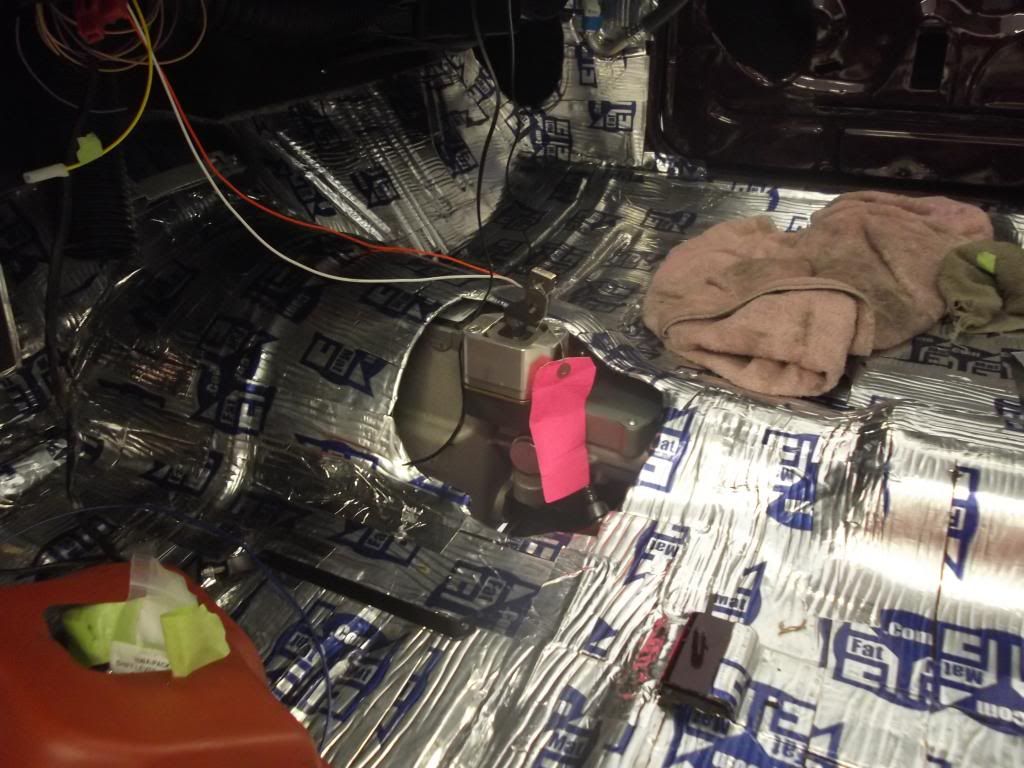 I do have a concern regarding the front passenger side brake line that I discuss in this thread: http://forums.maxperformanceinc.com/...d.php?t=751231 I have the RA/HO exhaust manifolds which require different front brake lines than the standard manifolds. The line runs around and behind the oil pan and is a little tight on the PS. I think I will remove the one bolted clip from Passenger side and move the line clear of the oil pan. Hopefully that will work.
__________________
John '67 Corvette Coupe 327, Tremec 5 Spd-SOLD 2010 Camaro 2SS-Traded 2015 Z51/3LT Corvette Stingray, Laguna Blue '67 GTO, 428, tripower, RS 600, finally done |
|
#45
05-27-2014, 07:44 PM
|
||||
|
||||
|
any recent progress!?!?
__________________
1967 GTO, 432 (428+.030), 4-bolt mains, factory Nodular crank, scat rods, icon dished pistons, Lunati HR 243/251@.050, .618/.622 lift, Edelbrock 72cc round port heads, 10.5:1, offy 2-4 intake, Edelbrock 650cfm carbs, Super T10 trans (2.64 first), BOP 10 bolt w/ Eaton posi and 3.36 gears |
|
#46
05-27-2014, 10:33 PM
|
||||
|
||||
|
Thanks for the inquiry Spud. Not much to report. This spring has been nuts! I work part time at the local CarQuest so that has been busy, then my Corvette differential had problems so I have been addressing that. The spider gear pin broke and locked up the diff. Fortunately it wasn't while I was driving! I was checking the half shaft U-joints and apparently by removing one it took some pressure off of the internals which caused the broken shaft to slide out and lock up the differential. So I took the diff and the trailing arms to Corvette Sports in Sheboygan to get rebuilt. Just got everything back together tonight. Hope to resume work on the GTO tomorrow. I was gonna work on it today, but got called in to work. Not sure if this "part time" gig is all it's cracked up to be...
I'll update when I get some more done. Thanks for the interest. Later
__________________
John '67 Corvette Coupe 327, Tremec 5 Spd-SOLD 2010 Camaro 2SS-Traded 2015 Z51/3LT Corvette Stingray, Laguna Blue '67 GTO, 428, tripower, RS 600, finally done |
|
#47
05-27-2014, 10:46 PM
|
||||
|
||||
|
I just re-read this whole thread and want to say that you are doing a great job. I sometimes wish I had done a resto-mod instead of trying to stay stock. But, that will happen on my next project if I can ever get this one finished!
__________________
Remember no one is perfect. Everyone's butt has a crack in it! |
|
#48
05-28-2014, 08:17 PM
|
||||
|
||||
|
Quote:
__________________
1967 GTO, 432 (428+.030), 4-bolt mains, factory Nodular crank, scat rods, icon dished pistons, Lunati HR 243/251@.050, .618/.622 lift, Edelbrock 72cc round port heads, 10.5:1, offy 2-4 intake, Edelbrock 650cfm carbs, Super T10 trans (2.64 first), BOP 10 bolt w/ Eaton posi and 3.36 gears |
|
#49
05-28-2014, 09:14 PM
|
||||
|
||||
|
I see Hydroboost. What unit is that? Love the stock looking lines.
But then, I guess I would. Charles Last edited by Old Goat 67; 05-28-2014 at 09:22 PM. |
|
#50
05-28-2014, 09:29 PM
|
||||
|
||||
|
Thanks Charles, I got my inspiration from your previous thread(s). It is a stock GM hydroboost from a '94 Astro van. The lines are AC Delco.
__________________
John '67 Corvette Coupe 327, Tremec 5 Spd-SOLD 2010 Camaro 2SS-Traded 2015 Z51/3LT Corvette Stingray, Laguna Blue '67 GTO, 428, tripower, RS 600, finally done |
|
#51
05-28-2014, 09:41 PM
|
||||
|
||||
|
Great job!
|
|
#52
05-31-2014, 11:01 PM
|
||||
|
||||
|
Ok, I have spent the month of May dealing with my Corvette rearend issues, so now I am back to the GTO when time allows. I did order a shifter handle from an eBay vendor that specializes in them and got what I wanted. It fits the console and shifter porch really good and looks great.
This pic shows the handle mounted to the right of the shifter stub, but I found that it will work better if mounted on the right and won't interfere with the console when in 5th or reverse. 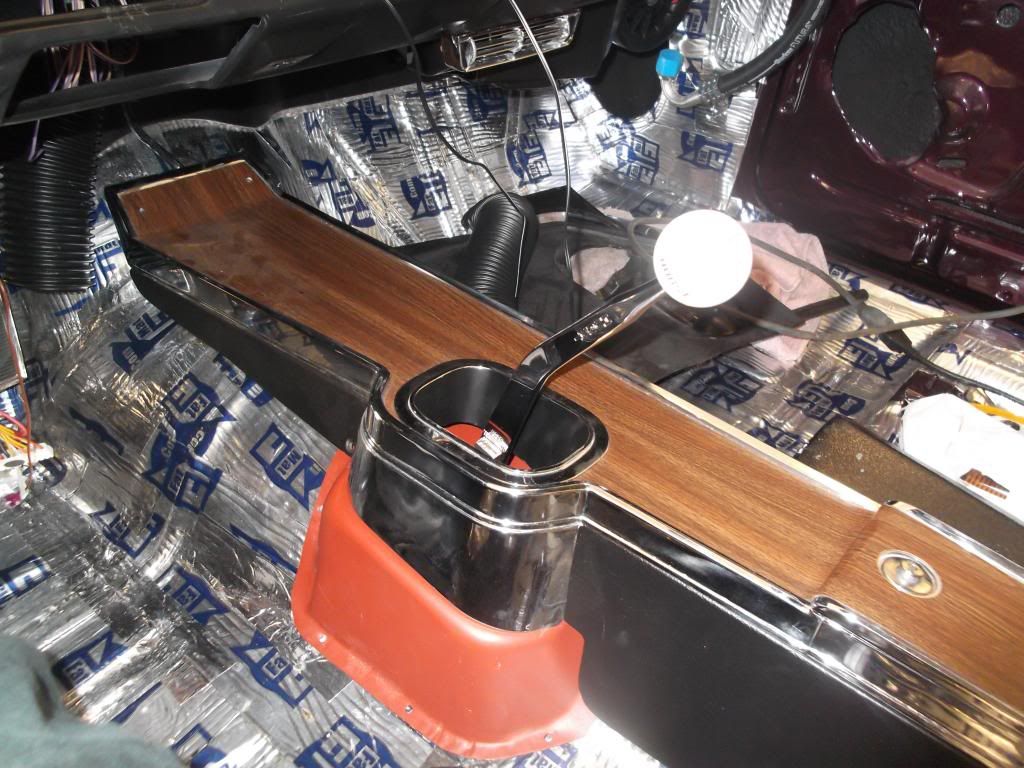 I started bleeding the brakes, but still have air in the sytem which I will address this week. I contacted CPP about this and the trick is to activate the parking brake several times and that sets it and then you can finish bleeding. He also pointed out some instructions available online which help. So today I decided to install the fuel tank. Fortunately for me the guy I bought this basket case from invested in new fuel lines and tank before he sold it. Cool. So I cleaned it up with some Scotchbrite pads and then shot it with some of Eastwood's satin Diamond Clear from the rattle can. Just trying to make the natural finish last a bit longer once it hits the road. 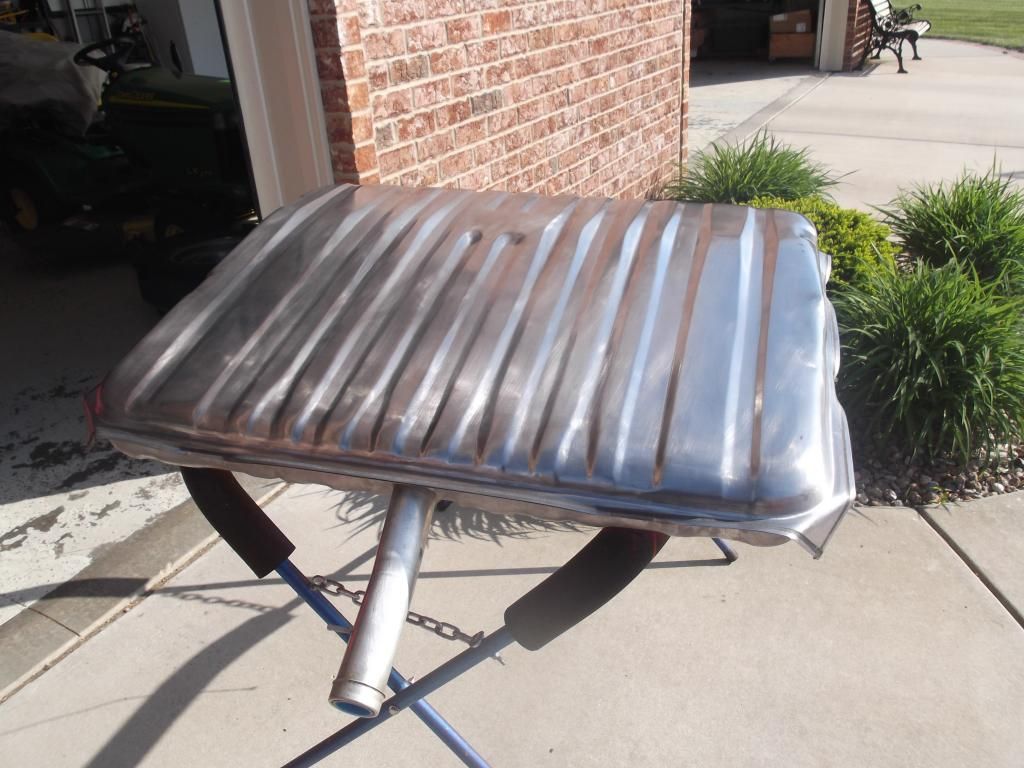 Then I covered the straps using 1" shrink tube, an idea I discovered on a Chevelle forum that someone did that I thought was a good idea. 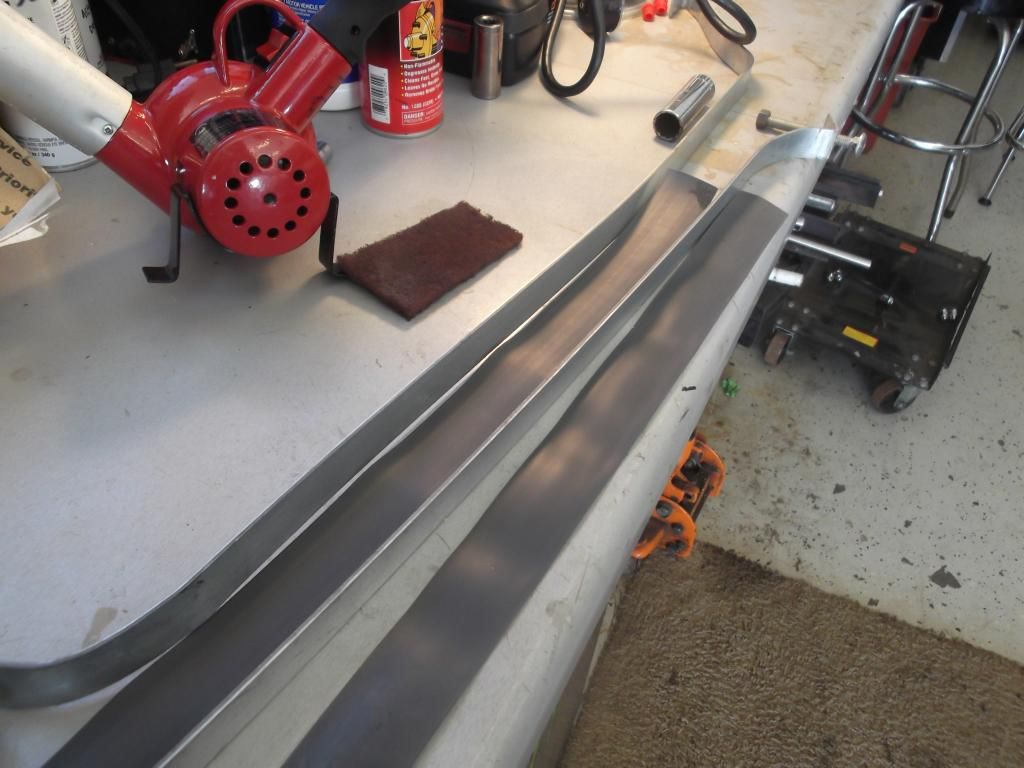 The wrap is a dark gray and gives the installation a nice "finished" look. 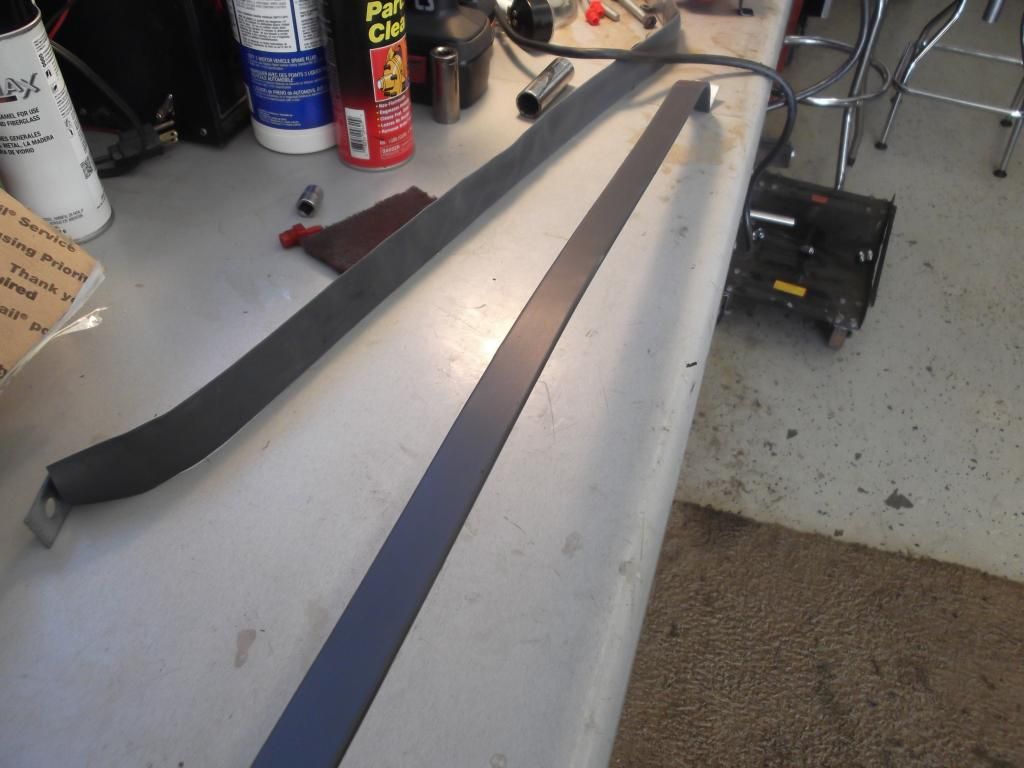 I completed this small project by attaching the ground and postive wires and fuel lines. 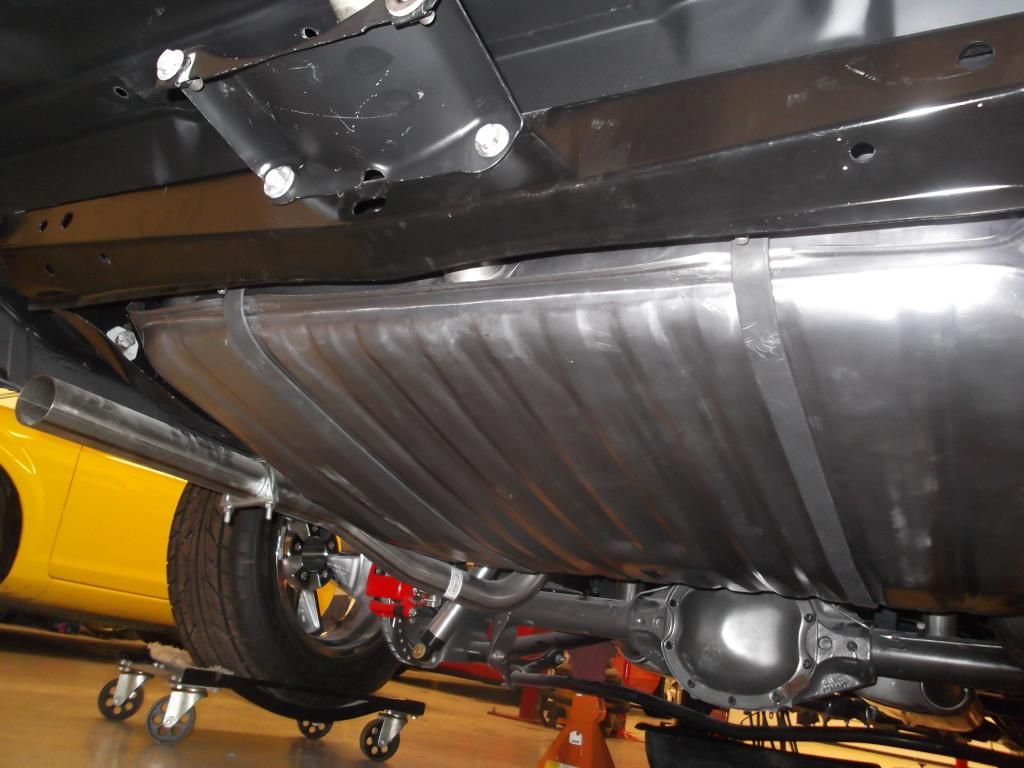 This week I should have time to get back at it and get the dash installed and finish the brakes.
__________________
John '67 Corvette Coupe 327, Tremec 5 Spd-SOLD 2010 Camaro 2SS-Traded 2015 Z51/3LT Corvette Stingray, Laguna Blue '67 GTO, 428, tripower, RS 600, finally done |
|
#53
06-01-2014, 02:53 AM
|
||||
|
||||
|
WOW, That is a great looking 67, I love all the small things that you are doing to it love the color also.
__________________
Cuz68 
|
|
#54
06-18-2014, 07:27 PM
|
||||
|
||||
|
Finally got some time in on the GTO so It's time to share my progress.
I installed the rear bumper which looks pretty good, but I will have to tweak it a little down the road when final body assembly takes place.  I also got the starter in which fought me tooth and nail. I ended up taking out the Driver Side engine mount bolt and raising engine and removing DS exhaust manifold to get at the starter wires and get them connected. It worked, but what a PITA. Is there a better way? I have HO/RA manifolds and the tube mounted on the engine mount, but getting the wires attached and starter in seemed impossible without raising engine. The seats got their Legendary seat covers and rally foams installed. I like the pearl look of the vinyl, I painted the rear and side covers to match. I think they were put on a little bit sloppy, so I may need to tweak them a little also. 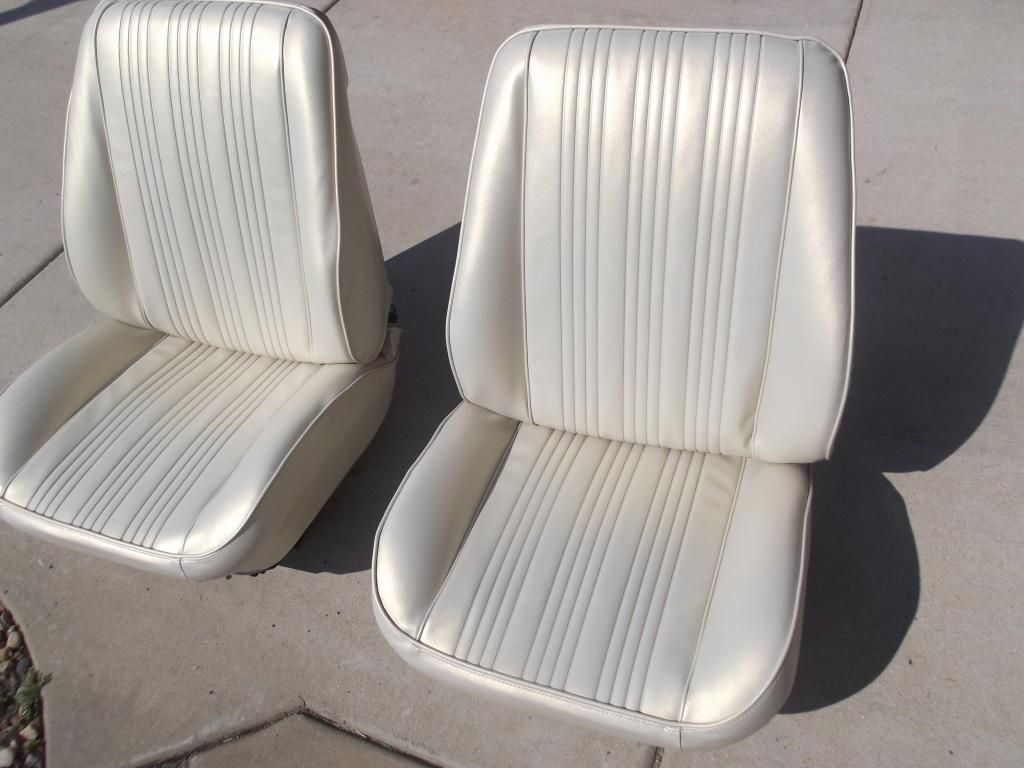 The big event for the day was I got the dash installed. After a couple of frustrating attempts I decided to take my time and move things around as needed and I got it in! Ultimately the screw holes even lined up! I am very pleased. It was kind of a mess getting all the duct work and wiring harnesses to get along with each other, but with some coaxing, I got 'er done.  Now on to the rest of the wiring harnesses and getting the brakes bled, still have some air in the system. More later...
__________________
John '67 Corvette Coupe 327, Tremec 5 Spd-SOLD 2010 Camaro 2SS-Traded 2015 Z51/3LT Corvette Stingray, Laguna Blue '67 GTO, 428, tripower, RS 600, finally done |
|
#55
06-18-2014, 07:54 PM
|
||||
|
||||
|
Never saw this thread before today somehow...Great job!
__________________
Greg Reid Palmetto, Georgia |
|
#56
06-19-2014, 12:17 AM
|
||||
|
||||
|
Wow, really coming along nicely! Definitely a lot further since I last seen it
__________________
1967 GTO, 432 (428+.030), 4-bolt mains, factory Nodular crank, scat rods, icon dished pistons, Lunati HR 243/251@.050, .618/.622 lift, Edelbrock 72cc round port heads, 10.5:1, offy 2-4 intake, Edelbrock 650cfm carbs, Super T10 trans (2.64 first), BOP 10 bolt w/ Eaton posi and 3.36 gears |
|
#57
06-19-2014, 08:08 AM
|
||||
|
||||
|
What are you using to protect the wires on the solenoid? It can't be emphasized enough how important this is. As you know, with the stock starter and ra manifolds, there is no room to keep the heat away from the wires and connections. After two attempts, we used some 1500 degree wrap and left nothing suseptible to heat. I also use a quick disconnect on the battery. It's obvious to me you know what to do, I just wanted to bring it out how important fire prevention is. Mine spontaneously arced and started smoking. I thought what may have happened if I hadn't been right there when it happened. I'm curious as to what insulation product you used as you work part time at the parts shop. Bill
__________________
67 gto conv. cover car on gto buyers guide, numbers matching, 62 catalina siverleaf green 67 gto conv. M22 , stroker, roller 400, carlisle blue, parchment interior 65 stingray original condition numbers matching 327 365 hp |
|
#58
06-19-2014, 08:53 AM
|
|||
|
|||
|
Did you reuse the original dash bezel? Im so jealous as mine looks like crap. Yours came our perfect.
|
|
#59
06-19-2014, 10:10 AM
|
||||
|
||||
|
Quote:
http://forums.maxperformanceinc.com/...d.php?t=754763
__________________
Greg Reid Palmetto, Georgia |
|
#60
06-19-2014, 07:07 PM
|
|||
|
|||
|
Quote:
|
| Reply |
|
|
The PY Online Forums is the largest online gathering of Pontiac enthusiasts anywhere in the world. Founded in 1991, it was also the first online forum for people to gather and talk about their Pontiacs. Since then, it has become the mecca of Pontiac technical data and knowledge that no other place can surpass.


 Linear Mode

