


| FAQ |
| Members List |
| Social Groups |
| Calendar |
| Search |
| Today's Posts |
|
#21
 10-11-2016, 04:03 PM
|
||||
|
||||
|
Quote:
That looks like a reasonable Product. ...I've built a few 3000 W Light dimmers using Triacs before. |
|
#22
10-17-2016, 07:11 PM
|
||||
|
||||
|
Here are some photos from Jim Hand's book. Hope they came out good.
I suppose we only use the curved part of the wooden template, right? I still don't understand how the part was made. It appears as though two different radii are used to create the curved end? See head bolt bulge. jpg, I have some questions in red. In the right hand photo it appears the valve stem casting has been removed. Is it suppposed to be removed? I don't know if this is correct or the picture is lacking detail. bt
__________________

|
|
#23
10-17-2016, 08:53 PM
|
||||
|
||||
|
I always seem to get my a$$ handed to me when i post pics on PY, but what the hell.
These are 4x heads I left much of the as cast guides --thin Bronze guides were installed later. 
__________________
Bull Nose Formula-461, 6x-4, Q-jet, HEI, TH400, 8.5 3.08, superslowjunk Last edited by Blued and Painted; 10-17-2016 at 09:21 PM. |
|
#24
10-17-2016, 09:49 PM
|
||||
|
||||
|
An older than me, old timer showed me a little trick on the push rod bulge.
Find two hack saw blades. Run one blade thru the push rod hole. Place the other in front of the intake surface, then bolt/screw the blades together on both ends. This will give you a line of sight reference on how much material can be removed from the intake runner before braking thru into the push rod hole. On my not so hot street application, i left a fat 3/16 of an inch material between the intake runner and the push rod hole. If You brake thru, there will be a big vacuum leak into the crankcase. Hope that makes sense. 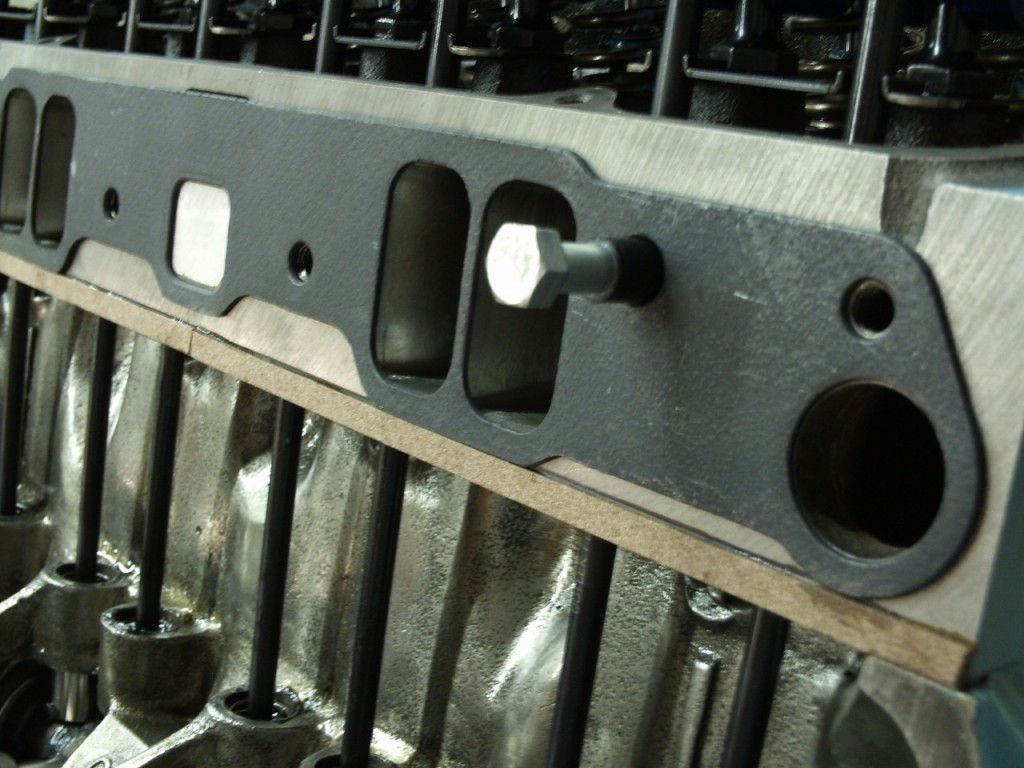
__________________
Bull Nose Formula-461, 6x-4, Q-jet, HEI, TH400, 8.5 3.08, superslowjunk Last edited by Blued and Painted; 10-17-2016 at 09:55 PM. |
|
#25
10-17-2016, 10:02 PM
|
||||
|
||||
|
It doesn't look like the red line is pointing toward the head bolt bulge. By the pic it would be further back.
__________________
Bull Nose Formula-461, 6x-4, Q-jet, HEI, TH400, 8.5 3.08, superslowjunk |
|
#26
10-26-2016, 07:31 PM
|
||||
|
||||
|
Quote:
__________________
|
|
#27
10-26-2016, 07:45 PM
|
|||
|
|||
|
Quote:
if this is your first time, i highly advise practicing on some junk heads before working on the set you plan to use. it's very easy to screw up. if you don't have a flow bench, it's even harder to get an idea if you're helping or hurting. I built a small bench from some plans i found in dave vizard's book. it doesn't give any real flow numbers, but the manometer gives me a good picture of how i'm doing.
__________________
1979 Firebird Trans Am 301/4spd (Now 428) 1977 Firebird Formula 400/Auto 2007 Grand Prix GXP 5.3L |
|
#28
10-27-2016, 09:59 AM
|
||||
|
||||
|
Quote:
Originally Posted by beertracker View Post For bowl checkers I ended up using prescription bottle and or caps. Drilled a center hole and installed a threaded bolt. Next it was chucked in a drill press and turned down with a dremel cutters. A micrometer was used to get the diameter measurement correct. bt QUOTE....not sure the plastic is going to work. i use old valves and or washers. when you're checking your bowl the valve will actually leave a small mark of where it is touching. this will give you an idea of where you need to go further.... QUOTE Good catch. I doubt if the plastic will leave a mark where it's touching. I will get some fender washers and continue on. I stopped by a machine shop and asked asked about cutting used valves down to my diameters and the owner didn't want the job. Business must be good. If you want something done you must do it yourself. bt bt
__________________
|
|
#29
10-27-2016, 10:23 PM
|
||||
|
||||
|
Chuck it in a drill and use a bench grinder.
__________________
Bull Nose Formula-461, 6x-4, Q-jet, HEI, TH400, 8.5 3.08, superslowjunk |
|
#30
10-27-2016, 11:01 PM
|
||||
|
||||
|
Beer, Im getting the idea your not well versed in tool usage.
You may want to bite the bullet and send this job out or buy some aluminum heads set up for your application. But if your bound and determined, carry on. It will be a learning experience, I'll be as helpful as i can over the net.
__________________
Bull Nose Formula-461, 6x-4, Q-jet, HEI, TH400, 8.5 3.08, superslowjunk |
|
#31
10-27-2016, 11:19 PM
|
||||
|
||||
|
QUOTE
Beer, Im getting the idea your not well versed in tool usage. QUOTE B&P, I am not sure how to read your comment and will leave well enough alone. No need to go through my education and job experience here. Thanks for the offer of assistance. When it comes to head porting all I know is what I read here, Jim Hand's book or find on the net. bt
__________________
Last edited by beertracker; 10-28-2016 at 12:10 AM. |
|
#32
10-28-2016, 03:15 PM
|
||||
|
||||
|
Once again i have Opened mouth and inserted foot.
Carry on Mr. beertracker.
__________________
Bull Nose Formula-461, 6x-4, Q-jet, HEI, TH400, 8.5 3.08, superslowjunk Last edited by Blued and Painted; 10-28-2016 at 03:38 PM. |
|
#33
10-28-2016, 08:19 PM
|
||||
|
||||
|
Quote:
A fella can certainlt use a bench grinder. My grind wheels make a helluva mess when re-dressing porting stones. So that shows my Harbor freight bench grinder wheels are cow pies, or worse....BS |
|
#34
11-13-2016, 09:45 PM
|
||||
|
||||
|
How is the porting project?
I found another pic. These flowed 240 @ .500 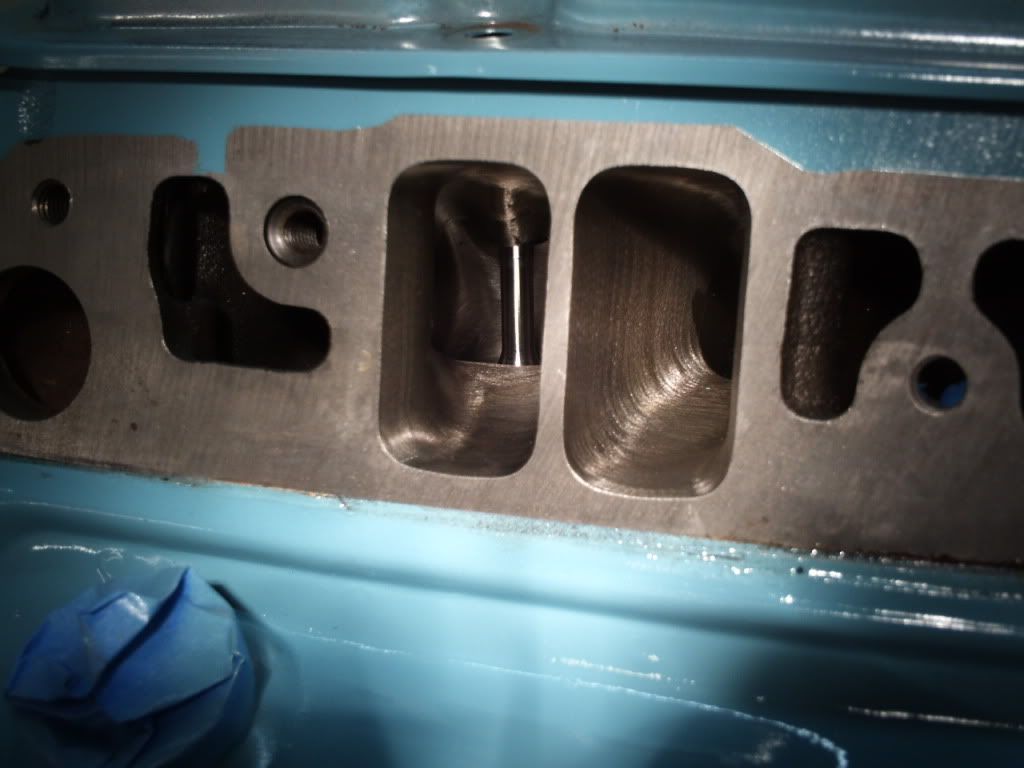
__________________
Bull Nose Formula-461, 6x-4, Q-jet, HEI, TH400, 8.5 3.08, superslowjunk |
|
#35
11-21-2016, 10:34 PM
|
||||
|
||||
|
Quote:
__________________
|
|
#36
11-21-2016, 10:52 PM
|
||||
|
||||
|
I assume HIS is using this tool http://www.harborfreight.com/53-amp-...der-62863.html I have looked at it a few times and can see how this would be nice to shape the runners and for other clean up as it can reach in a distance.
__________________
Brad Hansen 65 Cat Ventura, 66 Cat Vert, 63 GP |
|
#37
11-21-2016, 11:04 PM
|
||||
|
||||
|
Quote:
__________________
|
|
#38
11-22-2016, 04:17 AM
|
|||
|
|||
|
Here is how I make sure I don't go through the pushrod bulge:
Use a stiff, straight metal rod (in this case the shank from a ball shaped grinding bur) and a bungee cord to hold it against the inside edge of the pushrod hole.  Next up use a pair of small carpenter's squares (you could use speed squares too for this part) to scribe a line across the port face where the inside edge of the pushrod hole is.  Scribe a second line about .030" inboard from your first line. You can then use a pair of squares to verify how close you're getting.  I use a pair of calipers to keep the port width consistent from port to port.  First I reduce the pushrod bulge to that ~.030" wall thickness then I clean up the opposite port wall (divider between the ports) then I go through and find the widest port and grind on the divider wall on all other ports until they're all the same width at the pushrod bulge. Ideally what width would be as close to the port opening width as possible. This drawing shows more or less what you're trying to achieve by changing the radius of the short turn. You do NOT want to lower the port floor, just lay it back as little as possible to achieve the proper radius.  These 6X-4 ports flowed 245 @ .500" intake/180 @ .500" exhaust.    I use a Makita die grinder and can control the speed somewhat with a dimmer switch upstream of the receptacle. I buy the double-cut carbide burrs (for iron) from welding and machine tool supply shops. I find the egg/oval shape to be the most useful/versatile. The round ones are handy for the exhaust short turn, which is areal PITA to get to. You'll need to get some of that sandpaper that comes in long 1" or so wide rolls and feed that through the exhaust port to clean up the exhaust short turns as it's almost impossible to get them completely with a grinder or sanding roll. For aluminum you only want to use the single-cut style as the double cut will load up and become useless. You also need to use a lubricating oil when grinding on aluminum. Aluminum is messy and a PITA. I much prefer iron.
__________________
---------------------------- '72 Formula 400 Lucerne Blue, Blue Deluxe interior - My first car! '73 Firebird 350/4-speed Black on Black, mix & match. |
|
#39
11-22-2016, 10:17 AM
|
|||
|
|||
|
I should have mentioned please use a full face shield when porting. I need prescription glasses to see so I wear them and a face shield. I also wear a dust mask at the very least. You don't want to ingest iron dust and I have had to have iron bits removed from an eye. It is painful and expensive as it rusts immediately when it gets into your tears. Be careful. I remove the chips with a vacuum. If you use compressed air, have your shield on.
|
|
#40
11-22-2016, 09:39 PM
|
||||
|
||||
|
Quote:
I also cut back 4 push rod bulges. Those are some great ideas here on how to locate the outer edge of the push rod holes using hack saw blades or socket extension, squares and scribe. Very soon I will be into short turn work and will need to get a inverted tree cutter for this. So far I have been using a 6", 3/8" egg double carbide cutter with variable speed drill. As I get more experienced I sometimes change over to a right angle die cutter. A piece of cloth under the trigger reduces the sudden speed starts. A dremel tool and stone comes in handy for polishing. bt
__________________
|
| Reply |
|
|
The PY Online Forums is the largest online gathering of Pontiac enthusiasts anywhere in the world. Founded in 1991, it was also the first online forum for people to gather and talk about their Pontiacs. Since then, it has become the mecca of Pontiac technical data and knowledge that no other place can surpass.


 Linear Mode

