


| FAQ |
| Members List |
| Social Groups |
| Calendar |
| Search |
| Today's Posts |
|
#1
 12-06-2020, 11:18 PM
|
|||
|
|||
|
The upper ball joint boots on my 60,000 mile car are torn badly. I would like to just replace the boots at this point. I am not ready to tear the control arms out and do all the bushings.
Would putting on new boots be easy work with a pickle fork and a hammer, or am I mis-judging the effort. The car does have a new steering box, center-link tie rod ends, stabilizer links, sway bar bushings. Thanks! |
|
#2
12-06-2020, 11:26 PM
|
||||
|
||||
|
Since you need to pull the upper ball joint from. Spindle anyway, why not just throw a new ball joint in? Or are they factory OEM ball joints installed with rivets?
If they are 60k mile aftermarket ball joints i would put new in if going through that much work. Sent from my SM-G965U using Tapatalk
__________________
68 Firebird-- Street/Strip - 400/461 Eagle Forged Bottom End & Ross Flat top pistons. KRE 325 CFM D port, Ultradyne 263/271 @.050, .4267 lift. Crower Solid roller lifters and 1.65 stainless rockers. Quickfuel 1000 on Torker2 intake and 2" open spacer. Hedman 1.75" headers. TH400 w/brake. Ford 9" w/3.80 gears & 28x9 Hoosier pro bracket drag radial. Best ET: 1.35 60ft, 6.29 @ 107.20 mph, 9.99 @132.33 mph. 3,300 race weight |
|
#3
12-06-2020, 11:30 PM
|
|||
|
|||
|
Quote:
|
|
#4
12-06-2020, 11:40 PM
|
||||
|
||||
|
I do not recall how the boots were held in place on factory Ball joints, but after market ones are held in place my a metal plate that is sandwiched between ball joint and spindle. Meaning you would still need to take the old ball joint out to properly replace boot. OEM may be different- i am sure someone will chime in on that...
Sent from my SM-G965U using Tapatalk
__________________
68 Firebird-- Street/Strip - 400/461 Eagle Forged Bottom End & Ross Flat top pistons. KRE 325 CFM D port, Ultradyne 263/271 @.050, .4267 lift. Crower Solid roller lifters and 1.65 stainless rockers. Quickfuel 1000 on Torker2 intake and 2" open spacer. Hedman 1.75" headers. TH400 w/brake. Ford 9" w/3.80 gears & 28x9 Hoosier pro bracket drag radial. Best ET: 1.35 60ft, 6.29 @ 107.20 mph, 9.99 @132.33 mph. 3,300 race weight |
|
#5
12-07-2020, 09:30 AM
|
||||
|
||||
|
Could not edit my text, but of course meant "sandwiched between ball joint and underside of control arm" , not spindle.
Sent from my SM-G965U using Tapatalk
__________________
68 Firebird-- Street/Strip - 400/461 Eagle Forged Bottom End & Ross Flat top pistons. KRE 325 CFM D port, Ultradyne 263/271 @.050, .4267 lift. Crower Solid roller lifters and 1.65 stainless rockers. Quickfuel 1000 on Torker2 intake and 2" open spacer. Hedman 1.75" headers. TH400 w/brake. Ford 9" w/3.80 gears & 28x9 Hoosier pro bracket drag radial. Best ET: 1.35 60ft, 6.29 @ 107.20 mph, 9.99 @132.33 mph. 3,300 race weight |
| The Following User Says Thank You to leeklm For This Useful Post: | ||
|
#6
12-07-2020, 01:46 PM
|
|||
|
|||
|
There are replacement polyurethane ball joint boots available in black.
|
|
#7
12-07-2020, 03:10 PM
|
||||
|
||||
|
The boots on all of my moog replacement parts disintegrated before my resto even hit the road. Is there anything not garbage anymore?
__________________
462 Yc Block, zero deck Probe forged pistons 6cc relief, Scatt Hbeam rods floating pins aprox. 10.21 CR Comp Hyd-roller cam,roller lifters,springs ect. 236 244@ .050 108 LSA .511 lift, duration 289,297 @.oo6 Edelbrock Aluminum 87cc round port heads Larger valves ,ported polished and cut Powerjection3,T2 manifold, Try-ys Flowcooler water pump. 71 formula with TKO600,hydraulic clutch 3.42 posi and 26 inch tire. 17x9 YO Honeycombs with Nitto 555's |
|
#8
12-07-2020, 03:11 PM
|
|||
|
|||
|
Quote:
|
|
#9
12-07-2020, 04:33 PM
|
||||
|
||||
|
I've noticed new boots seem to crack quite easily without many miles.
__________________
Skip Fix 1978 Trans Am original owner 10.99 @ 124 pump gas 455 E heads, NO Bird ever! 1981 Black SE Trans Am stockish 6X 400ci, turbo 301 on a stand 1965 GTO 4 barrel 3 speed project 2004 GTO Pulse Red stock motor computer tune 13.43@103.4 1964 Impala SS 409/470ci 600 HP stroker project 1979 Camaro IAII Edelbrock head 500" 695 HP 10.33@132 3595lbs |
|
#10
12-07-2020, 04:48 PM
|
||||
|
||||
|
Quote:
Skip, do you know if the OEM boots were held in place with a bracket like the Moog replacement, or does the boot just sandwich between the spindle and ball joint? Sent from my SM-G965U using Tapatalk
__________________
68 Firebird-- Street/Strip - 400/461 Eagle Forged Bottom End & Ross Flat top pistons. KRE 325 CFM D port, Ultradyne 263/271 @.050, .4267 lift. Crower Solid roller lifters and 1.65 stainless rockers. Quickfuel 1000 on Torker2 intake and 2" open spacer. Hedman 1.75" headers. TH400 w/brake. Ford 9" w/3.80 gears & 28x9 Hoosier pro bracket drag radial. Best ET: 1.35 60ft, 6.29 @ 107.20 mph, 9.99 @132.33 mph. 3,300 race weight |
|
#11
12-07-2020, 05:21 PM
|
||||
|
||||
|
I do not remember. I'll check the cars at the shop Wed. I think I have the original uppers for the 81 that were untouched. Don;t think I replace the 78 BJ.
Heck I have some MOOGs in the box that are cracking.
__________________
Skip Fix 1978 Trans Am original owner 10.99 @ 124 pump gas 455 E heads, NO Bird ever! 1981 Black SE Trans Am stockish 6X 400ci, turbo 301 on a stand 1965 GTO 4 barrel 3 speed project 2004 GTO Pulse Red stock motor computer tune 13.43@103.4 1964 Impala SS 409/470ci 600 HP stroker project 1979 Camaro IAII Edelbrock head 500" 695 HP 10.33@132 3595lbs |
| The Following User Says Thank You to Skip Fix For This Useful Post: | ||
|
#12
12-07-2020, 05:32 PM
|
||||
|
||||
|
Quote:
__________________
1964 GTO 501, Edelbrock Heads NA, 3460 lbs. 9.76 @ 137mph 1971 Trans Am Lucy Blue, 11.56 @ 115 1966 LeMans. 462, SD prepped Kaufman D ports. 11.90 @ 112 1976 Trans Am twin turbo 462, SD Edelbrock heads 8.50@159 2009 G8 GT |
| The Following User Says Thank You to ErikW For This Useful Post: | ||
|
#13
12-07-2020, 06:22 PM
|
|||
|
|||
|
Quote:
|
|
#14
12-07-2020, 07:16 PM
|
||||
|
||||
|
Quote:
THis can be done, not easy, but possible. The pickle fork will possibly ruin the old ball joints. I have NOT done this on a "F" body,but have on other stuff. You need to first loosen the ball joint nuts, do not remove them, leave enough threads engaged to hold the spindle and control arm together, when the tapered wedge comes loose, having the spring separate them. To loosen the ball joints from the spindle, you will need to strike the spindle, where the ball joint connects. You will have to hit it pretty hard. The hammer blow will distort the hole that the ball joint shaft is in, allowing it to come loose. You'll need a BIG hammer... You WILL need to use some type on spring compressor to remove the ball joint nuts. THere's a LOT of spring pressure to deal with, BEWARE. Then replace the boots. Sounds like a lot of work, but replacing the ball joints is more work, drilling the rivets, and renting a ball joint press for the lower ball joint, plus you may have to remove the lower control arm, to do the lower ball joint... 
__________________
1977 Black Trans Am 180 HP Auto, essentially base model T/A. I'm the original owner, purchased May 7, 1977. Shut it off Shut it off Buddy, I just shut your Prius down... 
|
| The Following User Says Thank You to 77 TRASHCAN For This Useful Post: | ||
|
#15
12-07-2020, 07:20 PM
|
||||
|
||||
|
Quote:
__________________
1977 Black Trans Am 180 HP Auto, essentially base model T/A. I'm the original owner, purchased May 7, 1977. Shut it off Shut it off Buddy, I just shut your Prius down...
|
| The Following User Says Thank You to 77 TRASHCAN For This Useful Post: | ||
|
#16
12-07-2020, 07:46 PM
|
||||
|
||||
|
There is a ball joint separating tool that is just like a big bolt in a coupling nut I bought years ago. What the shop manual shows to use. Do one ball joint at a time if pulling the spindle. Back the nut off some on the one you want to loosen. Then start screwing out the bolt. It put pressure between the ball joint studs. A real stubborn one you may have to hit the spindle with a hammer. Does not teat the boots.
__________________
Skip Fix 1978 Trans Am original owner 10.99 @ 124 pump gas 455 E heads, NO Bird ever! 1981 Black SE Trans Am stockish 6X 400ci, turbo 301 on a stand 1965 GTO 4 barrel 3 speed project 2004 GTO Pulse Red stock motor computer tune 13.43@103.4 1964 Impala SS 409/470ci 600 HP stroker project 1979 Camaro IAII Edelbrock head 500" 695 HP 10.33@132 3595lbs |
| The Following User Says Thank You to Skip Fix For This Useful Post: | ||
|
#17
12-08-2020, 02:20 AM
|
|||
|
|||
|
Where to start?
1. Pickle-forks work. So does beating the piss out of the steering knuckle with a big hammer, or maybe bouncing a .22 bullet off of it. None of these procedures is the right way to do things. All of these procedures fall under the "crude, but effective" theory of auto repair. In short...don't do any of these. They can be HARMFUL. I paid money to an auto repair business I trusted, to put a CV shaft in my wife's Trailblazer, The fookin' babboon beat the steering knuckle with a hammer to separate the lower ball joint stud...and damaged the steering knuckle by pounding a half-moon shaped dent into it. The hammer blows raised a small "hill" of metal that distorted the surface the ball joint boot sealed against. I discovered the damage years later when I replaced the lower ball joints. Photo 1: Damaged steering knuckle at about "2:00 o'clock position". http://hbassociates.us/Trailblazer_Ball_Joints_21.jpg  Photo 2. A different angle, showing half-moon dent after I ground-down the upset metal, ready for re-assembly. http://hbassociates.us/Trailblazer_Ball_Joints_22.jpg  2. You can rent/borrow the proper tools to separate the ball joint stud from the steering knuckle at some auto-parts stores. As long as you bring the tools back in a reasonable amount of time, they refund your money so the whole rental process is "free". You're looking for the tool set similar to this: Photo 3. Front-end service set sold by NAPA, sourced from KD--Gearwrench. Other parts stores have similar tools in their "Loaner" program. http://hbassociates.us/Joint_Kit_001.jpg  The specific tool you're likely to use is the one on the left in this photo: Photo 4. Ball joint separator and tie-rod end separator http://hbassociates.us/Trailblazer_Ball_Joints_01.jpg 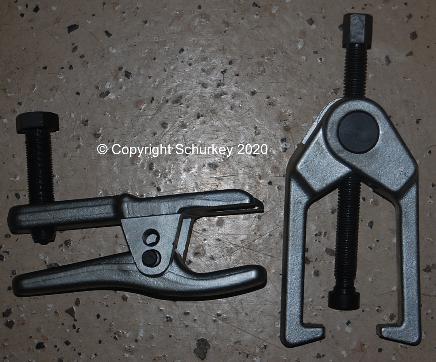 The BEST time to inspect a ball joint for wear is after you've got the stud separated from the steering knuckle. If there's any free-play...replace it. A used joint will have less friction than a new one; it's ok if the stud moves freely--but if there's ANY free-play, the joint is no longer holding your alignment angles like it should. A Polyurethane ball joint boot is almost certainly what you're going to need; the regular rubber boots that the ball joint comes with aren't available separately. For the record...the UPPER control arm is EASY to remove. You might as well replace the upper bushings. It's a simple job. The LOWER control arm is the one that the spring is acting on, that one is harder to work with. But the upper won't give you any trouble. Do it right--take the arm off the car so you can inspect the bushings, and replace as needed. Polyurethane bushings are the easiest for a DIY to install--no press, no special tooling. A propane torch and some sandpaper is about all you need. If the ball joint is worn-out, it'll be easier to replace when the control arm is mounted in a vice instead of mounted on the vehicle. Last edited by Schurkey; 12-08-2020 at 02:33 AM. |
| The Following 2 Users Say Thank You to Schurkey For This Useful Post: | ||
| Reply |
|
|
The PY Online Forums is the largest online gathering of Pontiac enthusiasts anywhere in the world. Founded in 1991, it was also the first online forum for people to gather and talk about their Pontiacs. Since then, it has become the mecca of Pontiac technical data and knowledge that no other place can surpass.


 Linear Mode

