


| FAQ |
| Members List |
| Social Groups |
| Calendar |
| Search |
| Today's Posts |
|
#21
 03-06-2011, 09:16 PM
|
||||
|
||||
|
That's going to be a very nice car when you're done. Projects ALWAYS take longer then what you think lol..
__________________
1969 Verdoro Green GTO #Matching 400 + .045, 4.21 Ohio Forged Crank, SD 290 KRE heads, Torker II, OF Cam, Etc... 1978 W72 Marty Blue T/A GONE |
|
#22
03-06-2011, 09:26 PM
|
|||
|
|||
|
I know. I've still got a long way to go. I still have to do pretty much all of the body work. It's fun though and I am learning a lot.
__________________
http://fattysgarage.wordpress.com/ |
|
#23
03-15-2011, 09:09 PM
|
|||
|
|||
|
Once I had the body pulled from the frame, I was ready to get going and get something done. I was extremely motivated at the beginning of the project. I've since learned that you need to treat this like eating an elephant, one bite at a time. I started out by removing the rear suspension. Man were the bushings shot. The control arms were pretty rusty. They are probably still use-able if anyone wants to pay a couples bucks for them. I chose not to re-use them as you will see in a few posts.
After the rear suspension was out, I proceeded to pull the front. This is where I learned the importance of a spring compressor. In hind sight it wasn't that big of a deal, but I scared the crap out of myself when I let the first castle nut on the ball joint loose.    I pulled the rest of the junk off of the frame and sandblasted it using the Black Diamond Media you can get from Tractor Supply. I used a home made sandblaster out of an aviation flight line fire bottle (sorry no pics). After blasting the frame and wiping it down to get rid of as much of the residue as possible, I shot it with an HVLP gun with Eastwood's Extreme Chassis Black Primer and Topcoat. I really like how it turned out and so far its held up pretty good with all the knocking around I've done on it. 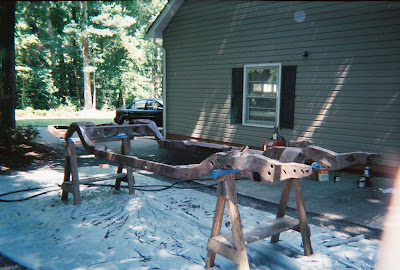 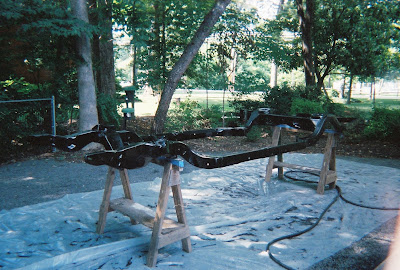
__________________
http://fattysgarage.wordpress.com/ |
|
#24
03-15-2011, 11:54 PM
|
||||
|
||||
|
I have some pictures of my 69's engine bay. I actually have a lot of pictures of my car. If you need some let me know. Here are some examples.
__________________
1969 GTO 4spd. Antique Gold/black, gold int. 1969 GTO RAIII 4spd. Verdoro Green/black, black int. 1969 GTO 4spd. Crystal Turquoise, black int. 1970 GTO 4spd VOE Pepper Green, green int. 1967 LeMans 428 Auto. Blue, black int. |
|
#25
03-16-2011, 07:53 PM
|
|||
|
|||
|
Thanks for the offer. I'll probably need some of that and the brake/fuel lines when I get there. Right now I'm getting started on body work.. so it will still be a while.
__________________
http://fattysgarage.wordpress.com/ |
|
#26
03-18-2011, 01:20 PM
|
||||
|
||||
|
Quote:
Of course, the Factory shop manual and Fisher Body manuals are must-haves as well but many people overlook that assembly manual.
__________________
Greg Reid Palmetto, Georgia |
|
#27
03-18-2011, 01:28 PM
|
||||
|
||||
|
Quote:
but, it's 2 to 2.5 X more legible. I have no idea where they get it from, but they seem to be the only source, as all the other ones i see are much much cheaper. get on their mailing list, as theyre always sending emails offering 10, 15, 20% off codes. but just make sure you order a few other things, otherwise youll get killed in shipping on it.
__________________
costs too much |
|
#28
03-18-2011, 09:46 PM
|
|||
|
|||
|
I have all three. I got an original service manual for 20 bucks at Hershey a few years back. I bought the Fisher body manual and the assembly manual from Ames. Like Money Pits said. Its crappy. Most of the pages are not legible, and the drawings that are, the words aren't. Is the one from YearOne really that much better? I'll look into it. Think they will have it a Spring Carlisle? I might pick it up then. I'd like to get my hands on that index. I bet it would make a world of difference.
__________________
http://fattysgarage.wordpress.com/ |
|
#29
03-18-2011, 10:07 PM
|
||||
|
||||
|
That last picture looks very familiar. When you get here it feels a little better.
|
|
#30
03-19-2011, 01:34 AM
|
||||
|
||||
|
I hope to be there soon, if you look close at that last pict. my car has just been soda blasted. Bare metal. Almost got all the metal work done and starting bondo soon.
__________________
1969 GTO 4spd. Antique Gold/black, gold int. 1969 GTO RAIII 4spd. Verdoro Green/black, black int. 1969 GTO 4spd. Crystal Turquoise, black int. 1970 GTO 4spd VOE Pepper Green, green int. 1967 LeMans 428 Auto. Blue, black int. |
|
#31
03-19-2011, 05:35 AM
|
||||
|
||||
|
Quote:
I keep seeing remarks to the effect that the Year One version is vastly superior to all others. The one I got off ebay is the only version I've ever seen so I can't compare. It is far from perfect but quite usable in my opinion. I'd say I can read about 75 or 80 % of it. I think I paid about $20 for it. By the way, GTOBOB's index even has notes describing the legibility of the particular pages referenced in it.
__________________
Greg Reid Palmetto, Georgia Last edited by Greg Reid; 03-19-2011 at 05:44 AM. |
|
#32
03-19-2011, 09:26 AM
|
||||
|
||||
|
Quote:
I will say this, the index that person spent so much time on, doesnt "fit" the 69 assembly manual i just got from YO a couple months ago. FWIW Fatty.....i dont think YO has parts at shows, at least they didnt when i was going on a regular basis about 10 years ago. IIRC, they only have catalogs and clothing to peddle.
__________________
costs too much |
|
#33
03-19-2011, 12:40 PM
|
||||
|
||||
|
Quote:
__________________
Greg Reid Palmetto, Georgia |
|
#34
03-19-2011, 03:44 PM
|
|||
|
|||
|
Cool. I'll spend some time checking it out tonight. It might turn out to be not so bad. I do have the same Millenium manual the index was written for. Maybe I just need to break out the magnifying glass. It sucks having bad eyes...
__________________
http://fattysgarage.wordpress.com/ |
|
#35
03-19-2011, 09:41 PM
|
||||
|
||||
|
Cool project-
__________________
keith k 70 Trans Am RA III / T400 / Lucerne Blue / Bright Blue 70 Trans Am RA III / M20 / Lucerne Blue / Sandalwood 70 Formula RA III / M21 / Lucerne Blue / Bright Blue |
|
#36
03-21-2011, 09:42 AM
|
||||
|
||||
|
That is a great project you have going. I keep getting these vicious flash backs. Keep the pics coming.
__________________
Send it! Its going home on a trailer. |
|
#37
08-14-2011, 04:28 PM
|
|||
|
|||
|
It has been a long time since I posted. I finally finished college, and my wife and I are working on plans for building a house, so time to work on the car has been minimal at best. I was able to work on some bits and peices in the last few months though. Hey, every little project counts! Below are some pictures.
I cleaned up the quarter marker housings and dropped in new lenses and gaskets. I still need to get new bezels.   I also cleaned up the tail lights and repainted the housings with plastic paint. I used some 600 grit wet/dry stepped up to 2000 with a final rouge polish on the tail lights. That was probably overkill, but they turned out real nice.   Last, but certainly not least, I sandblasted the wheels and repainted them. I used the Rally II tape off kit from Eastwood, and the paint that they sell. I think they turned out great!   
__________________
http://fattysgarage.wordpress.com/ |
|
#38
08-14-2011, 04:51 PM
|
||||
|
||||
|
Looks good!
__________________
 be a simple...kinda man. be a simple...kinda man.
|
|
#39
08-14-2011, 07:29 PM
|
|||
|
|||
|
I really like the tail lights. I'm going to try that on mine. Wheels look great, too!
__________________
1969 LeMans vert, 400 1971 Corvette 1964 Cadillac Deville so far.... http://s233.photobucket.com/albums/e...1969%20LeMans/ |
|
#40
08-17-2011, 10:22 AM
|
|||
|
|||
|
Great looking project !
|
| Reply |
|
|
The PY Online Forums is the largest online gathering of Pontiac enthusiasts anywhere in the world. Founded in 1991, it was also the first online forum for people to gather and talk about their Pontiacs. Since then, it has become the mecca of Pontiac technical data and knowledge that no other place can surpass.


 Linear Mode

