| FAQ |
| Members List |
| Social Groups |
| Calendar |
| Search |
| Today's Posts |
|
#1
|
|||
|
|||
|
Hey Guys.. has anyone removed and replaced the complete trunk floor on a 70-73 bird?? I'm in the process of getting all the spot welds and seams cut (God I hate spot welds) and thought I would start a thread. Does anyone have any tips, lessons , things to avoid/to make sure and do etc.. want to avoid as many mistakes/problems as possible. already cut the rear panel off and half way thru the trunk floow. appreciate any tips from members who have done this before..
|
|
#2
|
||||
|
||||
|
Done rear panals but never a floor. I'm sure you did , but I would tie the qtrs together at the top rear by tacking a tube across it in order to hold the original width. I'm sure chuck will chime in he's replaced every part on a second gen.
|
|
#3
|
||||
|
||||
|
Yep, contact Chuck.
http://www.forums.maxperformanceinc....d.php?t=743098 |
|
#4
|
||||
|
||||
|
If you want it done right you should ask Steve S, Tom in NY or Scott T. They have all helped me out a ton.
|
|
#5
|
||||
|
||||
|
Yes that is a fine group of talant you list, and all are williung to help when they can.
|
|
#6
|
|||
|
|||
|
Craig, I have put bracing in the top opening tacked in ,plus I found the measurements from a frame straightening catalogue on the distance between the rear frame rails at two points. These should help to keep the rear geometry where it was b4 I started cutting...
The biggest issue I have is the pinch welds on the sides and around the wheel wells. It is quite difficult to get in that area and use spot weld cutter to remove the floor side of the pinch welds. Guess you could just install over what is left, but I think I am going to just work thru it.. Was going pretty good on the tear out until I came to these damn pinch welds.. |
|
#7
|
|||
|
|||
|
Drill what is accessible, cut the rest out with your choice of either sawzall, cutoff wheel or air chisel. Remove the bulk of it, which should give you better access to the rest of the pinch welds. If you still have a few you can't get to with a drill you can grind most of the way through the piece to be removed then chisel the rest off. You also need to make sure the rail height stays put. I've done literally hundreds of these as well as 1/4s, floors, you name it over the past 30 years. I'd be happy to help you with any questions you have.
|
|
#8
|
||||
|
||||
|
Bill, don't try and do it all in a day. We arn't 20 any more, **** we arn't 50 anymore
|
|
#9
|
|||
|
|||
|
Yea.. I started Friday and know I still have 1-2 days of finish work on getting the seams clean.Then a day easily fitting the trunk in.. . I really hate spot welds now..
|
|
#10
|
|||
|
|||
|
Craig.. you were so right.. I can barely get moving today my back is hurting so bad from all the being contorted in and around the trunk.. really have respect for the professionals now that do this.. really not as easy as it looks..
|
|
#11
|
|||
|
|||
|
Welcome to my world. I guess it's like anything else, the more you do it the easier it seems. Still, I have a few aches some days and I won't be 50 for a few months. I'll take the "respect for the professionals as a compliment".
|
|
#12
|
|||
|
|||
|
71HO... yes, that is a compliment.. have big respect for those who do this daily.. The most difficult part is where the trunk floor piece makes room for the shock towers..the flange here is proving to be the most difficult piece in the trunk.. yea.. a lot harder than it looks..
|
|
#13
|
|||
|
|||
|
71HOT/A.. since you have done this a few times..maybe you can help me.. The flange on the side of the trunk where the shock towers are..this flange becomes part of the pinchweld under the car.. In this one spot looks like it is sandwiched between the flange of the shock tower and the inner wheel well.so there are 3 flanges pinchwelded together here... How on earth do you get this flange back into this pinchweld?? The other flanges on the trunk pan are just a standard two piece pinchwelds..
|
|
#14
|
|||
|
|||
|
You'll have to drill from the inner wheelhouse side, through the wheelhouse and trunk floor flange but try not to go through the shock tower. This is where a very sharp, stiff putty knife comes in handy. Use it like a chisel, go on both sides of the trunk flange to pop the welds the rest of the way loose. If you're having a hard time accessing it from the bottom cut the floor along the top edge of the flange being careful to only cut the floor and remove the bulk of it. Easy on the wheelhouse with the putty knife so you don't tear it, I don't think you'll hurt the shock tower. When you put the new trunk flange in simply drill though the wheelhouse holes, through the flange and clamp and plug weld the three together. I hope this is pretty clear, if not let me know.
|
|
#15
|
||||
|
||||
|
I've only done this once and we only cut out the inner portion of the trunk which is all that need to be replaced, the depression area. We used an air chisel to break all the spot welds and used right it really worked well. Of course as mentioned I am sure there are some areas that would be very difficult to get into with an air tool.
Couple of pics:   I'd really like to see some pics of your install, good learning experience to see what you've been doing. Thanks...
__________________
Jimmy www.firebirdgallery.com 2002 WS6 M6 Trans Am - original owner 1973 Trans Am 455/4-speed 1971 Formula 400/400 1969 GTO 400/400 - 3rd owner 1968 Firebird Convertible 350/200R4 POCI - AAC |
|
#16
|
|||
|
|||
|
I am 52 and I wouldn't do it......thank GOD for CHINA
|
|
#17
|
|||
|
|||
|
Quote:
|
|
#18
|
|||
|
|||
|
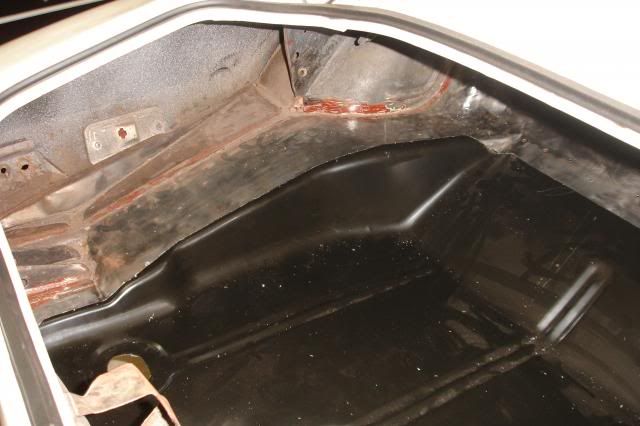
Here are some pictures of the trunk relace job. I will make a few posts here with different parts of the job. These are just the overall pictures
|
|
#19
|
|||
|
|||
|
Here are pictures of the center part where you can see the frame rails. WHen cutting the spot welds from the trunk floor,I went thru the frame rail flange. Will end up doing my plug welds from the bottom side using these holes.
|
|
#20
|
|||
|
|||
|
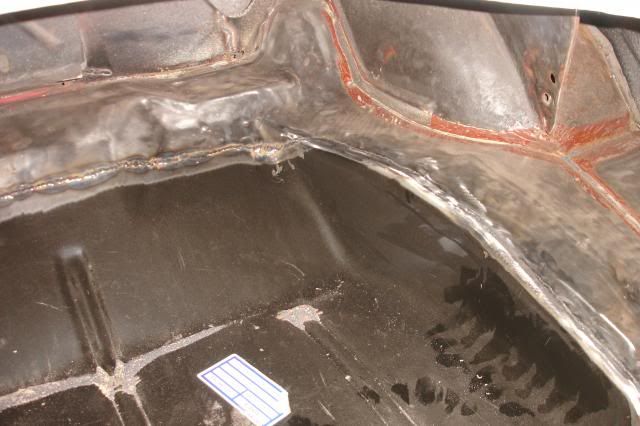
Here are the pinch welds I was complaining about. The trunk floor is welded in basically 3 spots. Spot welds along the frame rails,on the rear part joing to the inner tail panel and along the sides where the flanges form a pinchweld. I found it easiest to just cut the trunk into pieces and work sections at a time out. I think it would be near impossible to cut all these spot welds out and lift the trunk out as a solid piece. Once I cut the rear part that was welded to the inner tail panel out I cut the center section out in pieces while cutting the spot welds on the frame rails. Then I cut the remailing sides up almost flush to the pinch welds. From there I moved to a grinding stone and ground each weld out as seen in a couple of these pictures.
|
| Reply |
|
|