


| FAQ |
| Members List |
| Social Groups |
| Calendar |
| Search |
| Today's Posts |
|
#201
 04-23-2006, 07:13 AM
|
||||
|
||||
|
Steve,
How's the car comming? We need updates Dave |
|
#202
05-25-2006, 06:09 PM
|
||||
|
||||
|
I've been working on my other project lately (1987 IROC Z) and have been collecting parts for the T/A. I recently received my Gardner exhaust system and trial fitted it this afternoon. Amazing quality stuff! It took longer to bolt up the hangers than it did to hang the entire system. Everything slid into place by hand. The only problem I ran into was trying to finagle the intermediate pipes under the car without the car being on a lift. I was like one of those twisted nail puzzlers that you see in novelty stores. There was only one way to move, twist and rotate the pipe(s) around to get them into place. But after using my brain and lifting the car as high as possible on the jack stands, they eventually fell into place. I highly recommend their products. I trial fitted (no clamps) everything so I can start the car with an exhaust in place. The engine hasn't been run in 6 months or so and now that I have the radiator, power steering and everything else hooked up I want to get it sorted out.
|
|
#203
05-25-2006, 06:22 PM
|
||||
|
||||
|
Once in a while you actually find a bargain on ebay: I have been looking for an NOS front spoiler for the T/A. When you can locate one they run between $300 and $400 dollars. The reproductions are total garbage. This one was somewhat mis-described in its auction and I ended up getting it for $128! It is definitely an original NOS GM piece that came factory pre-painted in white. Here it is alongside my slightly used (smashed and burnt) original one:
|
|
#204
05-25-2006, 08:18 PM
|
||||
|
||||
|
good to see you back!!
|
|
#205
07-31-2006, 08:46 PM
|
||||
|
||||
|
Just so you don't all think I've been slacking. Here's what she looks like at the moment. Everything starts up and runs as designed, even the shaker flapper. I am waiting for the body shop to get the front sheet metal done before I bring the rest of the car down. Don't mind the damaged shaker, That is the original one the previous owner drove over when he was putting the fire out. I have a mint replacment waiting for paint.
I just dropped off the original honeycomb wheels at the media blaster today to get the several layers of incorrect silver paint off of them. I'll update when they come back. 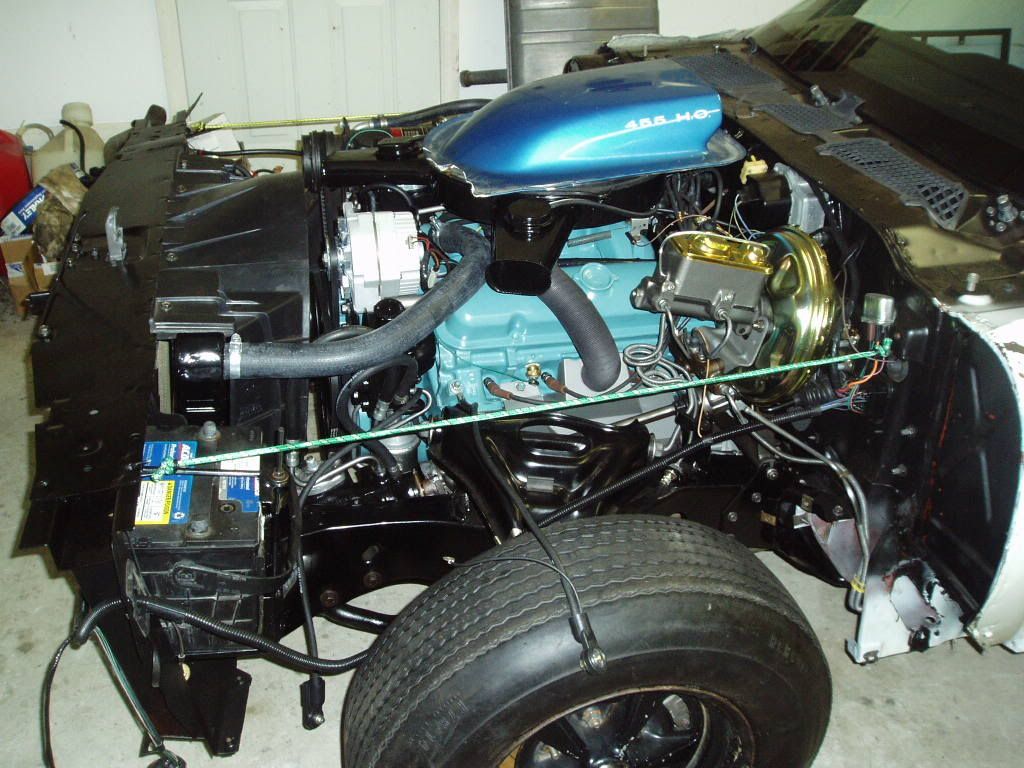 
|
|
#206
08-01-2006, 11:44 AM
|
||||
|
||||
|
I was patiently waiting for this thread to be resurrected! Nice work Steve! Keep the pics/info comin'.
|
|
#207
08-02-2006, 12:28 AM
|
||||
|
||||
|
when you're finished with the "spare" scoop sell it $$$$
a NOS one went for $800 bucks on ebay http://cgi.ebay.com/ebaymotors/ws/eB...MEWA:IT&ih=005
__________________
Contact Me on NEW ID = Silverbird . |
|
#208
08-02-2006, 03:24 PM
|
||||
|
||||
|
Looking fantastic Steve! I have 2- 72 T/A's. I am in the process of restoring the automatic car right now. Your documentation on the PY board is great for everyone to see your progress. BTW, is that a Gardner exhaust system? How much do they cost? Keep up the good work! JT
|
|
#209
08-02-2006, 03:34 PM
|
||||
|
||||
|
Thanks for the compliments. Yes, that's a Gardner exhaust. I would highly recommend them for their reproduction of the orginal system. The pieces just slide into place, no hammers, no "adjustments". They are dead-on perfect. With brackets and hangers they probably run close to $1,000. But they are exactly what the factory put on. The system sounds very nice and rumbly too, just like it sounded from the factory.
If you are going for all out performance and every horse counts, have your own system made up at a custom shop. If you're on the east coast there is a great custom exhaust place in Trenton, NJ called Mufflex. http://www.mufflex-performance.com/ I've had them do the systems on my "non-stock" cars and even my tow vehicle. They are amazing there, it's like watching a balloon artist at a kids party. The owner just walks under your car on the lift, takes a look and then walks over to the mandrel bender and voila! an amazing exhaust sculpture that fits your car the first time out. I gained 42 hp on the chassis dyno on one of my Mopars with his system. |
|
#210
08-03-2006, 09:10 PM
|
||||
|
||||
|
I sent out the honeycombs to be media blasted to get them ready for refinishing. They came out great. I ended up using the same facility as in this article.
http://www.goatsgarage.com/huny1.html They had them done in three days. Awesome job. They stripped off about four or five layers of crappy silver paint and this was the result. Now I can refinish them with that $40 a can OEM honeycomb paint. Ouch! |
|
#211
08-04-2006, 07:12 PM
|
||||
|
||||
|
Here is a wheel after priming with the OEM flexible primer. I sprayed the rest of the rim (sides and back) with a Rustoleum grey that was very close to the original. I searched various auto parts stores and eventually found the correct flexible bumper repair kit. I found this at a Napa store. They pulled it off of a back shelf and blew the dust off the box. It looks like 1980s vintage packaging but it worked fine. A couple of the rims had factory moding flaws and air pockets that needed to be filled. Also three of the rims had edges that were not fully molded to the rim from the factory. I ended up just gooping it on my finger and spreading it by hand on the edges, kinda like doing bathtub caulking.
Last edited by njsteve; 08-07-2006 at 01:33 PM. |
|
#212
08-04-2006, 08:16 PM
|
||||
|
||||
|
Steve,
Where did you find the yellow jack stand pads? Been looking locally for some with no luck. Also, did you have your engine paint mixed to the formula on this site (http://fiedlerh.home.att.net/enginecolor.htm) or did you have another source? SWEET looking ride, btw!! Vince
__________________
1971 GTO 455 H.O. Ram Air Nordic Silver - Black |
|
#213
08-04-2006, 08:44 PM
|
||||
|
||||
|
I dont remember where I got the jack stand pads but I do recall just googling the term "jack stand pads" and coming up with a bunch of hits. The engine paint is that $40-a-can OEM brand. They are the only ones that seem to have the exact 1972 color in a spray can. It covers very well I think I painted the entire engine in just one can!
|
|
#214
08-05-2006, 09:20 PM
|
||||
|
||||
|
Here's the finished product. The OEM Honeycomb wheel paint actually goes a long way. I painted all five wheels with one can! I bought three. I ended up using a second can just to get a heavy coat on the wheels but the finish didnt change much with the extra paint. Good stuff, if you follow the directions and spray it from 8 to 10 inches away, it leaves a dry textured finish with lots of metallic sparkles. After painting them in the driveway I walked inside and the wife asks me "Where the heck have you been, the disco?" I was covered in the sparkly overspray, looking like I just came back from a hard night at Studio 54, circa 1977.
Last edited by njsteve; 08-07-2006 at 01:45 PM. |
|
#215
08-08-2006, 07:24 PM
|
||||
|
||||
|
Here are the 2 of the 5 finished wheels. I indexed the tires so the letters are all in the same spot on all four road wheels. Since the 72 Honeycombs don't use a trim ring, which would cover the wheel weights, I decided to balance the wheels on the backside only. As much as I have harped on the price of the very expensive OEM line of spraypaints, I do have to admit they are the exact, correct finsh, they make the wheels look great, and each can goes a long way.
|
|
#216
08-08-2006, 08:56 PM
|
|||
|
|||
|
Steve,
The wheels look great....factory fresh. Even though I'm running trim rings on mine, I really like the correct look of the honeycomb wheels minus the rings. I also covered all five wheels with one can of OEM paint. OEM is really a close match to the original finish. Since there are so many honeycombs out there painted with an incorrect bright silver, don't be suprised if someone tells you that yours are too dark. I get that all the time. Jim |
|
#217
08-09-2006, 09:59 AM
|
||||
|
||||
|
Steve, what size Radial T/As are you running on the Honeycombs? I've got 235/60R15s on mine & they look too small when mounted on the wheels...
|
|
#218
08-09-2006, 08:44 PM
|
||||
|
||||
|
They are the same size as yours. Does your car sit too high, hence giving it too much air between the top of the tire and the fender edge? That size is the direct replacement for the original F60x15.
|
|
#219
08-10-2006, 09:33 AM
|
||||
|
||||
|
Quote:
|
|
#220
08-10-2006, 10:08 AM
|
||||
|
||||
|
Great information source Steve.
Where did you get the correct honeycomb paint? |
| Reply |
|
|
The PY Online Forums is the largest online gathering of Pontiac enthusiasts anywhere in the world. Founded in 1991, it was also the first online forum for people to gather and talk about their Pontiacs. Since then, it has become the mecca of Pontiac technical data and knowledge that no other place can surpass.


 Linear Mode

