


| FAQ |
| Members List |
| Social Groups |
| Calendar |
| Search |
| Today's Posts |
|
#621
 05-07-2008, 06:35 PM
|
||||
|
||||
|
Wow that sounds awesome, where can I buy that Gardner exhaust? And it sounds so easy to put in also, And it looks orginal. Your car is turning out great.
__________________
68 Firebird Coupe 350/Auto/Air 70 RA III Formula/Auto/Air 71 T/A 455HO/Standard/Air 73 T/A 455/Auto/Air |
|
#622
05-07-2008, 07:04 PM
|
||||
|
||||
|
You can only buy them directly from Gardner:
http://www.gardnerexhaust.com/firebird.html They are expensive but well worth the money if you want an exact duplicate of the original exhaust system. |
|
#623
05-08-2008, 08:55 PM
|
||||
|
||||
|
Back to the body adjustments.
I spent the evening heating and molding the fender flares and front spoiler with the heat gun. It actually worked very well. My original repairs from over the winter were very close to the actual body lines without ever having touched the car during the repair process. I lucked out on that one! Though the flares and front spoiler use a rubberized welting to mask the seam where they meet the body panels, there were still large gaps in some areas. The front spoiler was the worst. Before I started there was a 3/4" gap between the spoiler and the valance. This was due in part to the factory misalignment when they glued the rear support section to the front spoiler section. I used the heat gun and softened the rear portion and moved it forward, which then reduced the gap to 3/8 inch. After that, it was heat the edge, push with a wooden paint stirrer and then hold til the plastic cooled, then repeat along the entire edge of the part. The first photo is the spoiler after I fixed the rear support and started on the driver's side, reducing the gap. You can still see that the gap is larger on the left side of the photo. And then the heat gun in action and the patented wooden paint stirrer tool holding the hot plastic til it cools: And the finished front spoiler: |
|
#624
05-08-2008, 08:56 PM
|
||||
|
||||
|
Here's the left and right front flares. It took a bit of massaging to get them to flow properly into the spoiler. The factory transition leaves a lot to be desired, aestheticly.
|
|
#625
05-08-2008, 08:57 PM
|
||||
|
||||
|
And the rear flares. Suprisingly, the majority of the screw holes in the flares actually lined up with the existing screw holes in the fenders and quarters. I only had to move and refill a couple, just so the flares wouldn't be under stress when they were bolted up.
|
|
#626
05-08-2008, 08:58 PM
|
||||
|
||||
|
And the finished flares installed for final fitting:
|
|
#627
05-08-2008, 09:48 PM
|
||||
|
||||
|
Steve, great attention to detail. That is the way to do it -- the heat gun is an essential (and it will look better than any car that ever rolled off the assembly line!).
__________________
keith k 70 Trans Am RA III / T400 / Lucerne Blue / Bright Blue 70 Trans Am RA III / M20 / Lucerne Blue / Sandalwood 70 Formula RA III / M21 / Lucerne Blue / Bright Blue |
|
#628
05-11-2008, 03:05 PM
|
||||
|
||||
|
Spent the afternoon tuning. I changed the plugs from the black soot-covered Autolites, to a set of NGKs. I set the dwell to 30 degrees and the timing to factory spec of 10 degrees BTDC with the vacuum advance disconnected and plugged
I had a nice pleasant time setting the idle mixture the old-fashioned way with a vacuum gauge and the low rpm range tach on the Sun machine. I pulled and plugged the vacuum lines, unscrewed the mixture screws out 2-1/2 turns (that was actually the existing setting on the carb) and set the idle to 850 rpm. I checked the vacuum reading - it was about 17 inches. After turning in the screws a half turn at a time trying to get the highest vacuum reading (and readjusting the idle speed back to 850 after each sequence) I finally got to 21 inches of vacuum before the lean stumble would appear. That ended up being about 1-1/4 turns out on each. It really made a difference in the eye-burning atmosphere in the garage. She starts right up at the first turn of the key now. 
|
|
#629
05-12-2008, 03:59 PM
|
||||
|
||||
|
Quote:
__________________
"The Future Belongs to those who are STILL Willing to get their Hands Dirty" .. my Grandfather |
|
#630
05-12-2008, 04:05 PM
|
||||
|
||||
|
It is very personalized service at Gardner. You have to call them to discuss what you want. They make it all to order, and the price can vary considerably because they have so many options you can add to the system like flanges, hangers, finishes, clamps, etc. I think I spent about $900 including shipping, for my system with hangers and clamps and with me supplying my flanges for the manifolds.
|
|
#631
05-13-2008, 09:17 PM
|
|||
|
|||
|
Quote:
|
|
#632
05-13-2008, 09:57 PM
|
||||
|
||||
|
The upper dates are D20 K1R.
|
|
#633
05-23-2008, 09:46 PM
|
||||
|
||||
|
I got the front end aligned today. Since the car is still minus its interior and glass, etc. I had to find all the iron weights and barbells in the house and loaded them into the car. I tossed a couple floor jacks and my 3/4 drive set in there too. I also filled the gas tank up to the top. All that was probably good for about 300 pounds of ballast.
I trailered it to an old timer in the area who retired about 30 years ago and now drives a school bus as a daily job. He works out of a local garage in his spare time. It's amazing to watch an old skilled craftsman at work. He uses a set of bubble gauges that mount on the wheel hub that are from the late 1930s, art deco labeling and all! I had him do the alignment on my Camaro years ago and he did an awesome job. No one today at the chain store, tire shops has any idea how to align "old" cars with the upper A-arm shims, let alone have the extra shims in stock. If it doesn't involve a computer, "laser beams" and a cam to turn, they have no clue whatsoever. This guy even had all the specs memorized. When I told him I was going to be using bias ply tires instead of radials he told me he would adjust the specs accordingly since the bias plies need a little different tweak to the alignment to prevent the twitchy-ness that people associate with those repro tires. This guy was a pleasure to deal with. And he charged $50 for 2 hours work! While I was there, the owner of the old garage wanted to know if I could use a few old car books. Look what he gave me! Original 1960s, 70's and 80's Chilton hourly rate books with all the OEM part numbers and prices. |
|
#634
06-10-2008, 07:36 PM
|
||||
|
||||
|
Up til now I had 4 completely mismatched tires on the car, which was upsetting the body man with how the car sat so unevenly. So I found a pair of 15 inch rally rims on craigslist for $30 and was able to mount a pair of the 20 year-old Comp T/A/s on them. They are hard as rock but will work fine as bodyshop rollers. I need to find two more 15 inchers to replace the mismatched front 14 inch rims with 2 different 60's on them. At least I'm halfway there.
I have been starting her up and (allegedly) driving her around the cul-de-sac every few days just to warm the drivetrain up and to get all the dust out of the ductwork. The things on the doors are a couple of pieces of roll bar padding to protect nearby stuff from those 100 pound, wide-swingin' doors. 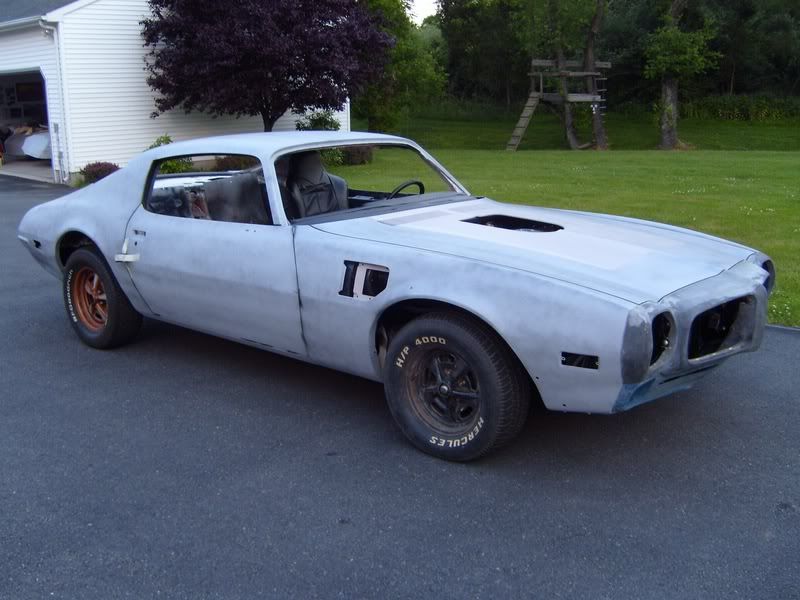 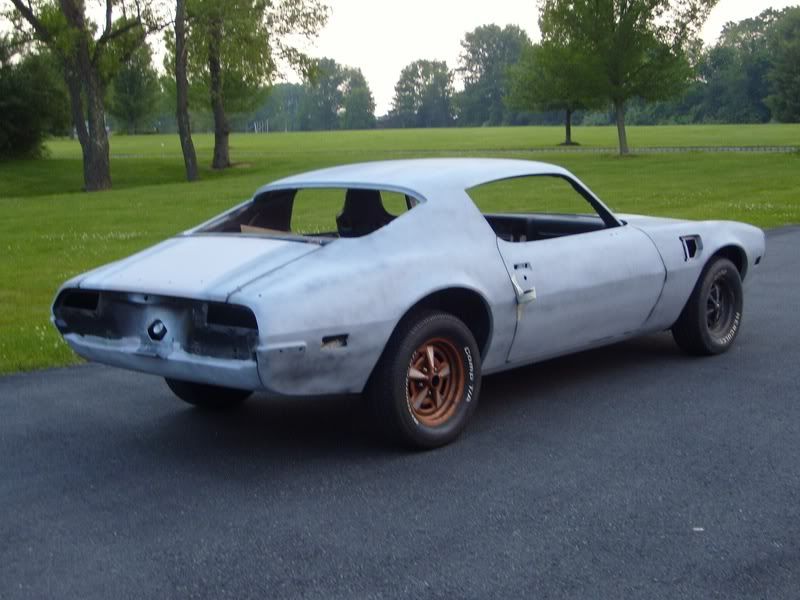 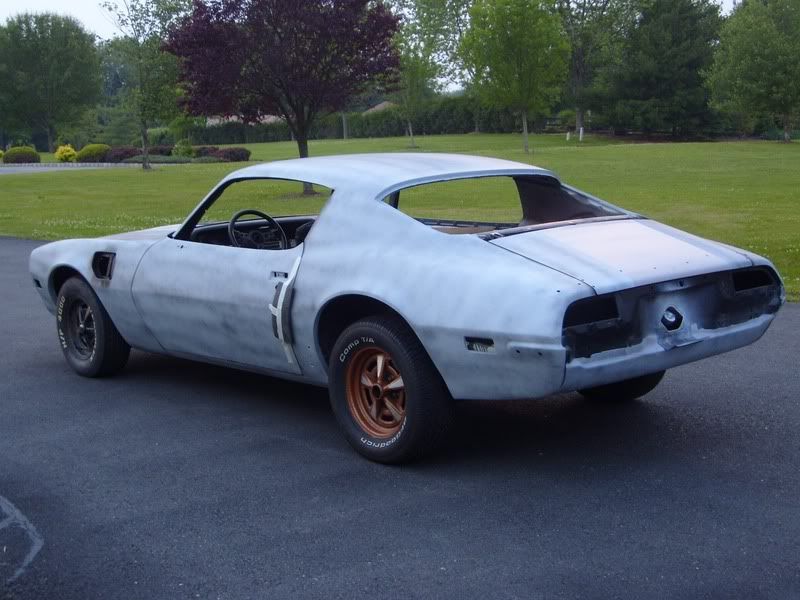
|
|
#635
06-10-2008, 07:38 PM
|
||||
|
||||
|
Since the uploading function wont let me upload into thumbnails, I will have to uplaod the complete photos. Sorry if this messes up people's displays but someone has to fix this problem one of these weeks...
|
|
#636
06-10-2008, 07:38 PM
|
||||
|
||||
|
I figured out a way to paint the new fender flare welting. Everybody who restores these cars tends to paint them the same color as the body which is incorrect. The welting material was originally supplied in bulk as a white latex-like material (on the white cars). They were installed at the factory that way, unpainted.
Since my old welting is petrified beyond useability, (that's them on the right, in the photos), and the new welting comes light grey, I ended up using white interior vinyl due. I cut the pieces to the correct lengtths, trial fitted them on the flairs, then removed them and over a period of several days I lightly misted the individual sections of welting until they were very thinly covered in white. They are now extremely flexible and should work out fine. The problem with painting the welting (other than being incorrect) is that even with flex agent, they will crack at the severe angles the welting has to conform to. Here they are just temporarily press fit to the flares for storage purposes, and so they get a "set" for their final positioning. 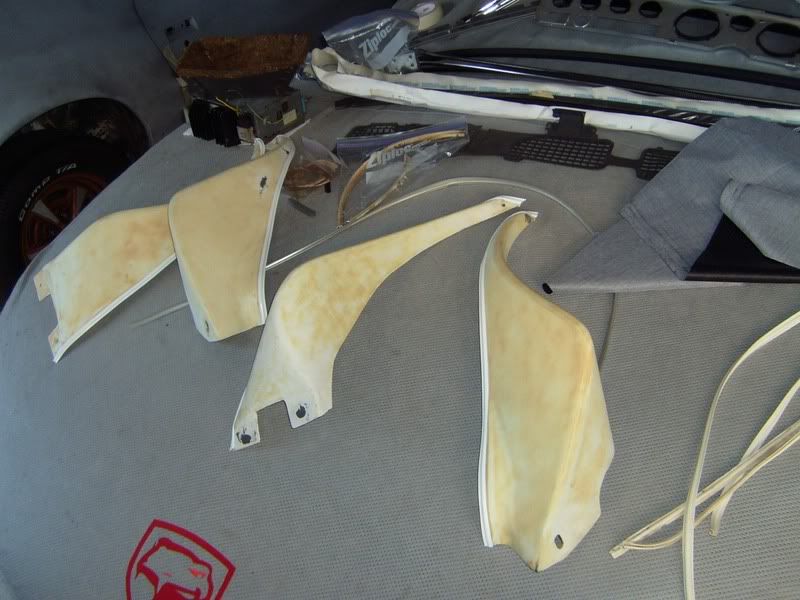 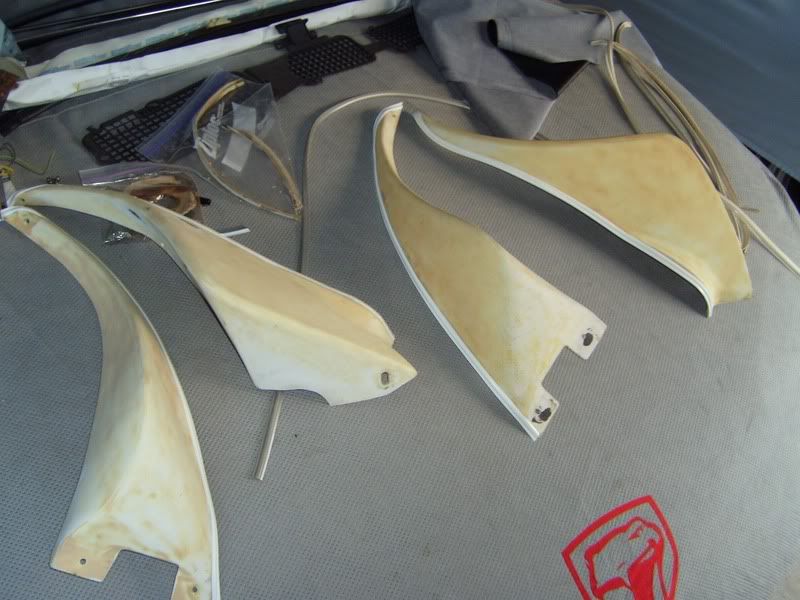
|
|
#637
06-10-2008, 07:39 PM
|
||||
|
||||
|
I also used up a four cans of Plastikote dark green/aqua trunk paint to get a preliminary coating on the primered trunk floor. On the sides, I was careful to cover the same areas, including the original undercoating/sound deadener that the original trunk paint was sprayed over.
I will probably end up using the Eastwood black/aqua stuff unless anyone has a better recomendation of something that comes in a spray can form. 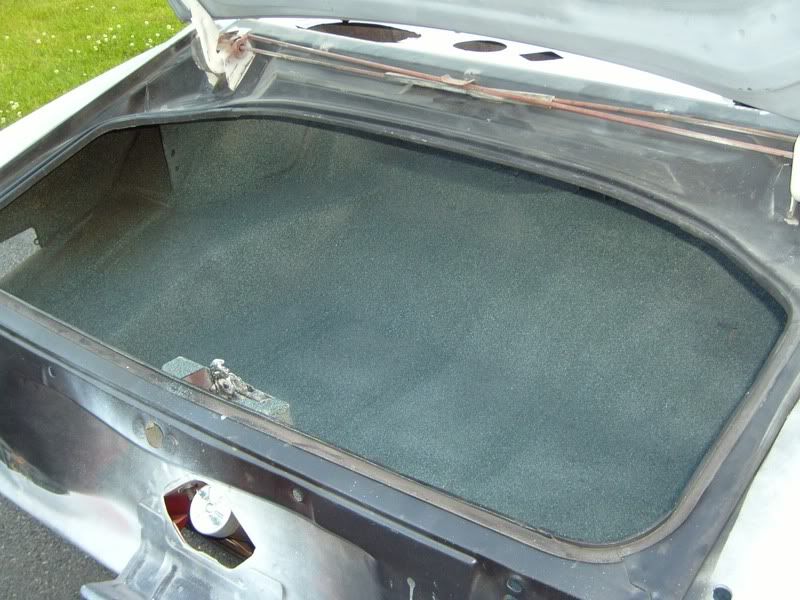 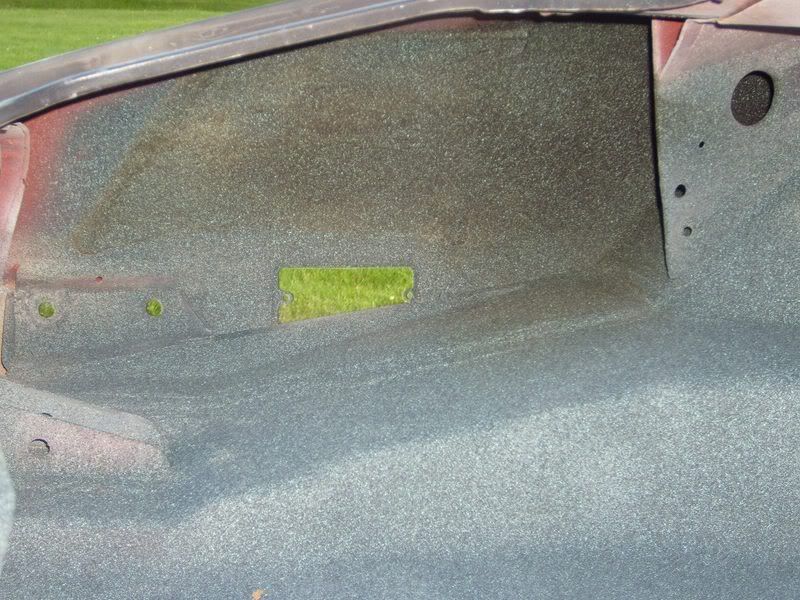 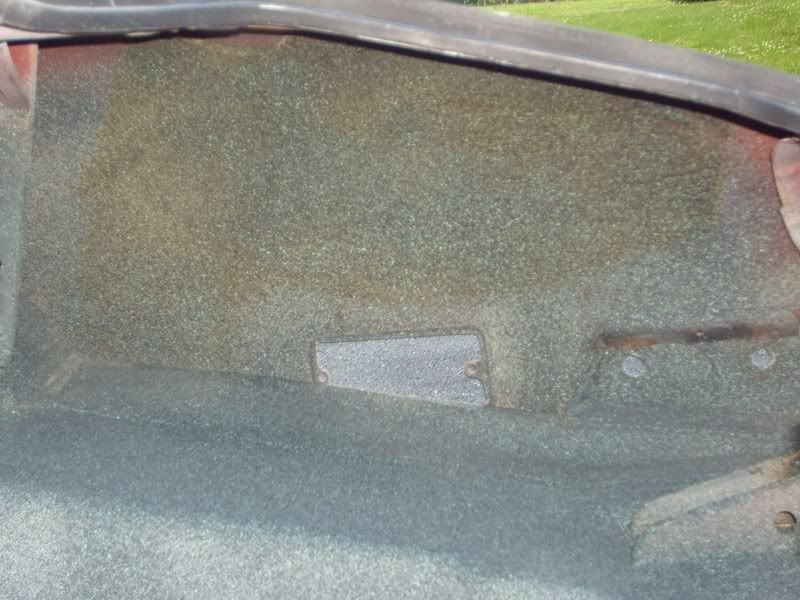
|
|
#638
06-10-2008, 10:38 PM
|
||||
|
||||
|
Steve,
Thats the exact same thing I'm doing on the welting. I hope it lasts. |
|
#639
06-11-2008, 01:39 AM
|
||||
|
||||
|
Good work Steve.
Now the real question... Do you really have a Mopar in the garage...???...!!! 
__________________
************************************************** ******************* 73 TA 4 spd #'s match red/white - "STOLEN" AT TERRY SPEAR's SHOP IN Columbia TN ~mid 2014 Last offical pic of the car can been seen here: http://clubs.hemmings.com/pontiactn/...%20-%20rev.pdf People have seen it posted FS on Craigs List back in late 2013 early 2014.... ^^^^^^^^^^^^^^^^^^^^^^^^^^^^^ IF YOU HAVE ANY INFO ABOUT IT PLEASE CONTACT ME!!! |
|
#640
06-11-2008, 06:31 AM
|
||||
|
||||
|
Two Mopars actually. The old Viper makes a great workbench! :-)
|
| Reply |
|
|
The PY Online Forums is the largest online gathering of Pontiac enthusiasts anywhere in the world. Founded in 1991, it was also the first online forum for people to gather and talk about their Pontiacs. Since then, it has become the mecca of Pontiac technical data and knowledge that no other place can surpass.


 Linear Mode

