


| FAQ |
| Members List |
| Social Groups |
| Calendar |
| Search |
| Today's Posts |
|
#1
 03-28-2013, 03:29 PM
|
|||
|
|||
|
So. I have a 1976 Trans Am with a Pontiac 400. Since the car has to still be smogged in California, the only header option for me was the Hedman 28150 Headers, which have a CARB number and all the paperwork that goes along with that, but, you have to have a y-pipe to a single cat single exhaust system with a vertical crossflow in the back. Which is kind of lame. So.. I'm making this thread to show that, even though no one makes a viable Header-back y-pipe for a 2nd gen Firebird, this is how we fabbed one up for my car. A couple notes about the headers. They fit great, the top of the collector flange is just below the top of the frame rail. I didn't take any side pictures, because they would be inaccurate because my car is abnormally low.
note 1: We had to go from the gigantic 51258 Wix oil filter for the Pontiac, to the 51045 small block Olds 403 oil filter, because of how tranny cooler lines get in the way. Note 2: It does clear the starter, but we took the starter down to avoid scratching up the headers on install. Note 3: You have to take off the oil filter adapter to get the passenger side Header on. Note 4: Use their provided 3/4" long header bolts, we tried 1" long ones, and they were impossible to get on unless you managed to get them all in before putting the header up to the motor....maybe. Note 5: Man, Pontiacs are a PAIN IN THE ASS!!!!! The header flanges have the strangest angles for the bolts, make sure you have some shorty wrenches. Note 6: I went from stock logs to the headers, so the car obviously feels a hell of alot better and actually wants to rev properly even with a 216 at 0.50" degree cam and highway gears. Note 7: We paid the extra couple hundred for the ceramic coating, and felt like in the end it was probably not worth it. They don't bake it before they send it to you that much, so they're really easy to scratch deeply. Also, I would do a cam style break in to bake the coating, if you opt for the 28156. 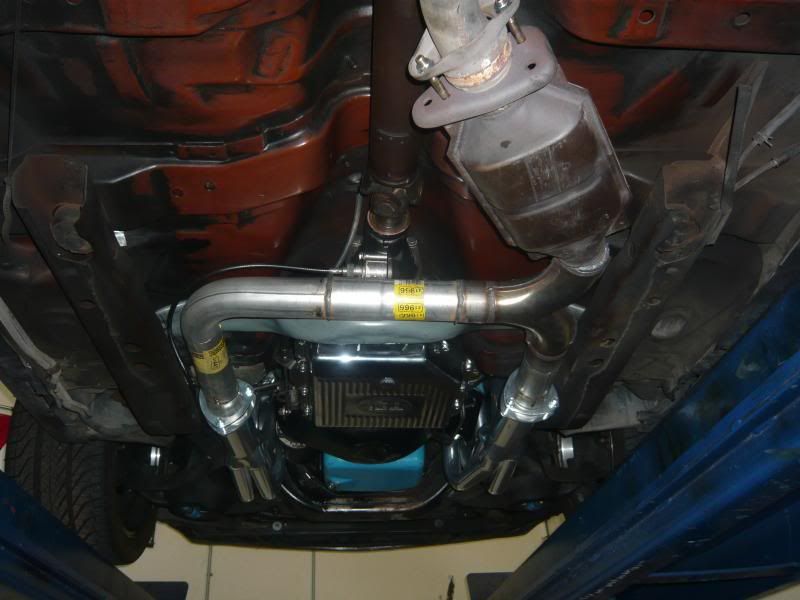 For the Y-pipe, we used a Walker 90 degree angle 12" on each end bend, and 2 12" straight sections. Everything is 2.5" after the headers. We also used a Magnaflow T-connector instead of the standard Y bell. http://www.magnaflow.com/02product/d...rtnumber=10734 I personally think it's pretty slick and fits under the car great and didn't move the cat away from the original position. We fabbed the y-pipe up with clamps then took it to the Muffler shop and had it all welded up. |
|
#2
03-29-2013, 04:16 PM
|
|||
|
|||
|
Clean install - looks good. Glad to hear how good those headers fit. I've used Doug's - but they are expensive.
I can't believe the rules out there...no one gets to run true dual exhaust w/ two cat's?? |
|
#3
03-29-2013, 04:58 PM
|
||||
|
||||
|
The install is clean but that Y-pipe routing looks like it could flow a lot better, your slamming the passenger bank in to the drivers instead of merging them.
|
|
#4
03-30-2013, 04:20 AM
|
|||
|
|||
|
Quote:
|
|
#5
03-30-2013, 04:22 AM
|
|||
|
|||
|
Quote:
|
| Reply |
|
|
The PY Online Forums is the largest online gathering of Pontiac enthusiasts anywhere in the world. Founded in 1991, it was also the first online forum for people to gather and talk about their Pontiacs. Since then, it has become the mecca of Pontiac technical data and knowledge that no other place can surpass.


 Linear Mode

